Contents
How to EQ vocals correctly in 11 easy steps
A lead vocal is the main element of any song & you cannot deny it, can you? It’s always under the spotlight of the song and therefore needs to sound perfect. To make it perfect so that it appeals to the listeners, you need to remove any discrepancy and also polish it so that it shines all the way through.
What’s better than an EQ? So let’s see how to EQ vocals correctly..
- Identify the type of song.
- Visualize your vocals first.
- Prepare the vocals for EQ.
- Use subtractive EQ.
- Remove the low end.
- Remove the boxy, muddy and nasal frequencies.
- Scoop out mids for intimacy.
- Shape the dynamics.
- Enhance the presence and brightness.
- Enhance the unique frequency.
- De-ess the vocal.
These 11 steps is the summary of all that you need to follow in order to EQ your vocals perfectly which the professionals do. Let’s understand each step in detail..
Before we start, let me introduce you to our –
Make sure to check it out.
1. Identify the type of song
You might think what on earth does the song type needs to do with EQing vocals, but believe me, your EQ decisions are pretty much always influenced by the style of the song you are making.
I’ll give you an example, if you are making an RnB song for example and you want to have an intimate vibe, that will govern your vocal tone differently than if you want to make a rock song.
In a rock song, your EQ can be pretty aggressive in some region of the frequency spectrum.
Your heavy guitars will influence your EQ moves for the vocals. So does every style will. Do you get that? I hope you do.
First you need to do an analysis of the type of song that you’re making. Pay attention to the track’s elements.
Look at what type of vocal tone will they allow so that the vocals come out as great as they can be and enhance the listening experience of your listeners.
2. Visualize your vocals first
Visualization plays an important role in music production. It goes into production, mixing, mastering, sound design, vocal production and what not. Infact your song starts with a visualization.
You hear everything in your head before you ever touch your DAW or may be a notepad to write lyrics.
As far as vocals are in question, engineers are always found to talk in a fashion like oh I want my vocals to sound this way or that way..
You see, this type of decisions arrive when an engineer hears the sound in his mind before he does anything. He visualizes the end result in his mind already of how his vocals are doing (or should do) with the rest of the music.
I assure you that this tip is the best and most important one that you need to follow in every step of music production.
- When you visualize the end result beforehand, two things happen – one, you won’t waste time only to discover what your vocal is going to sound like and two, you now have the right direction to take your vocals to and that is perfect because you already have a sense of the overall sound.
When you have got the direction you just need to make every possible adjustment to the vocals to reach your target and you will save a ton of time.
Whatever time you put into doing this task, will be fully effective and not a second will go useless.
Trust me it’s a tiny advice but it’s a game changer!
3. Prepare the vocal for EQ
Preparing is the key for any task to be successful. If you prepare your vocals well, the steps you’re going to take further, will take you to accomplish vocal mixing easily.
By preparing I mean to trim, cut, slice the vocals wherever required. If there are any extra part of the vocals hanging around, just remove it.
You should remove the blank parts of the recording so that it doesn’t contain any smallest amount of noise.
This will make the vocal recording super clean.
- Remember to fade the ends of the vocals where you slice them as that could introduce clicks due to the tiny bits of the audio that you may neglect as it will sound really ugly.
4. Use subtractive EQ first
Now when the preparation is done, it’s time to apply corrective EQ first which is called subtractive EQ. With this, you eliminate or reduce frequencies that are not serving the vocals or the mix.
Why do you do the subtractive EQ first?
In a common mix practice, the processing order is – correction, dynamics shaping and enhancement.
Since the dynamic shaping is crucial to mixing, the corrective EQ is placed before a compressor because removing frequencies will take the burden off of the following compressor and the compressor will react to the recording in a justified way with no unnecessary frequency triggering it. This is why there’s a corrective EQ placed before everything else.
A method to do this is to use any parametric EQ and make a bell curve and increase its volume then sweep the entire frequency spectrum to find those nasty frequencies that make the vocal sound muddy and resonant.
- Sometimes, if the vocal calls for it, a de-esser may also be placed before or after the corrective EQ.
5. Remove the low end
The vocals need low end very rarely. In a song, the low end below 100 Hz is never required. So high passing the low end after 100 Hz is preferred. You can even take it to 120 Hz.
Low Cutting the frequency below 100 Hz altogether is a common and important practice.
- It is important to do that because the region below 100 Hz or 120 Hz is the region dedicated to the bass and the kick drum. Allowing the vocal’s low end to stay in that region will eat up the space of the kick and the bass creating a mess in that region.
You can see in this image how I have cut the low end in my vocals below 100 Hz.
The slope I have used is a gentle 12 dB per octave.
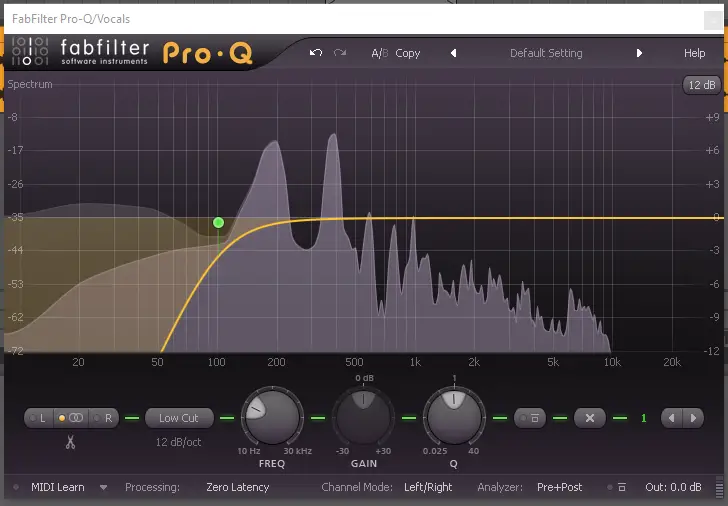
Vocal Low Cut
6. Remove the boxy, muddy and nasal frequencies
Vocals are really prone to accumulating boxy frequencies which exists between 300 Hz to 500 Hz. This makes the vocal sound as if it is recorded inside a box.
The microphone and the recording space is responsible for this.
It is not fixed exactly which frequency may be resonating and creating this problem so you need to sweep around in that frequency range a little bit to pin point the boxy frequency and reduce that a little or more depending on the recording.
The goal is to hear a clear low-mid tone.
Below is the image of the ugly frequencies that I have removed from the vocal recording I was working on. I found and reduced two regions where the vocals were creating a muddy and boxy impression
I was hearing a little muddy tone below 200 Hz so I took out a little of that too.
Muddy frequencies exists below the boxy region till 100 Hz. It actually raises the low end information in the vocals and makes the vocals sound dull.
Be very careful with cutting that because removing too much of it will make your vocals thin and not removing it will add the muddiness and dullness to your vocals.
- Nasal frequency is another ugly characteristic of any vocal recording. The nasal frequencies lie from the 800 Hz to 1 kHz.
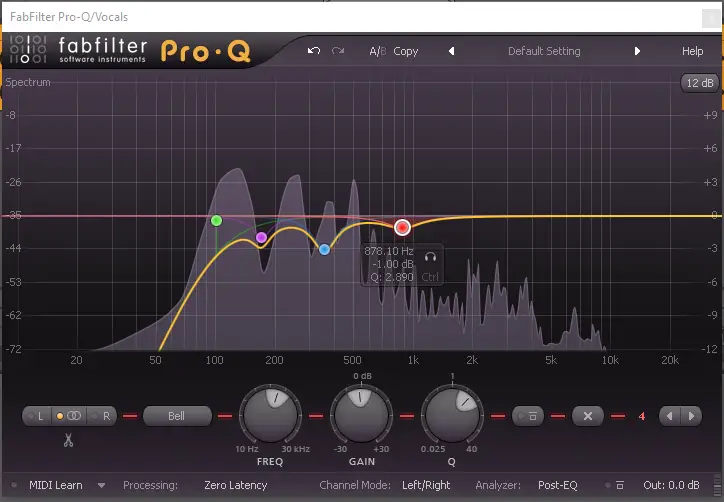
Removing bad frequencies from vocal
In this image I have removed the three common ugly frequencies that I had in my vocal recording to make it more clear and balanced.
7. Scoop out mids for intimacy
Now there’s a trick that makes the vocals sound more closer and intimate that I want to share with you. Removing the mid frequencies around 500 Hz to 1 kHz region gives the vocals a different vibe.
The vocals feel more closer and intimate this way and I personally like the effect of it.
Now it really depends on whether it will suit the vibe of your song or not. Most RnB songs tend to benefit from this trick.
In the image you can see I have scooped out a little mid region. Notice that I have done it in a very little amount.
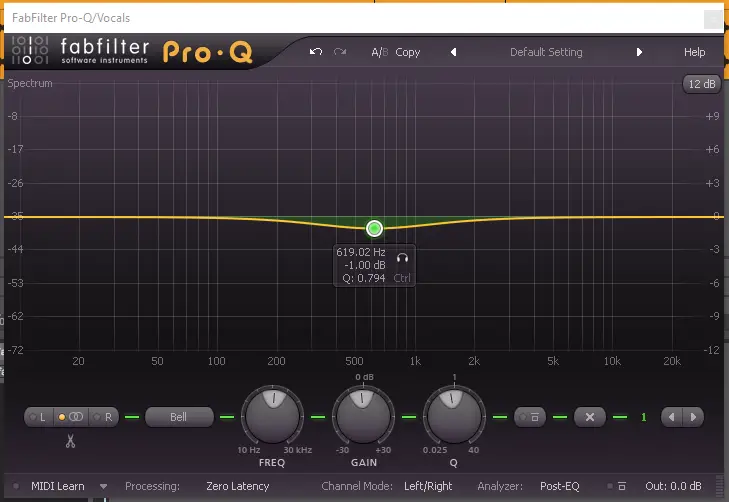
Scooped out mids
This technique is my personal favorite as I just mentioned and I tend to do it on rap vocals and some RnB vocals.
I encourage you to try it on your vocals and hear it for yourself. Experiment!
8. Shape the dynamics
After the corrective EQ is finished, it’s the turn for a compressor to shape the dynamics of the vocals.
I’ll give you one more tip here to shape the vocals more transparently.
- I slice the words and firstly I adjust the volume manually of those words to a consistent level that mimics a natural flow and not just flat throughout. After manually doing this, I apply compression on the vocals.
That way i don’t have to drive the compressor harder and my vocals are good with moderate compressor settings. More importantly the compression is applied very effectively in this way.
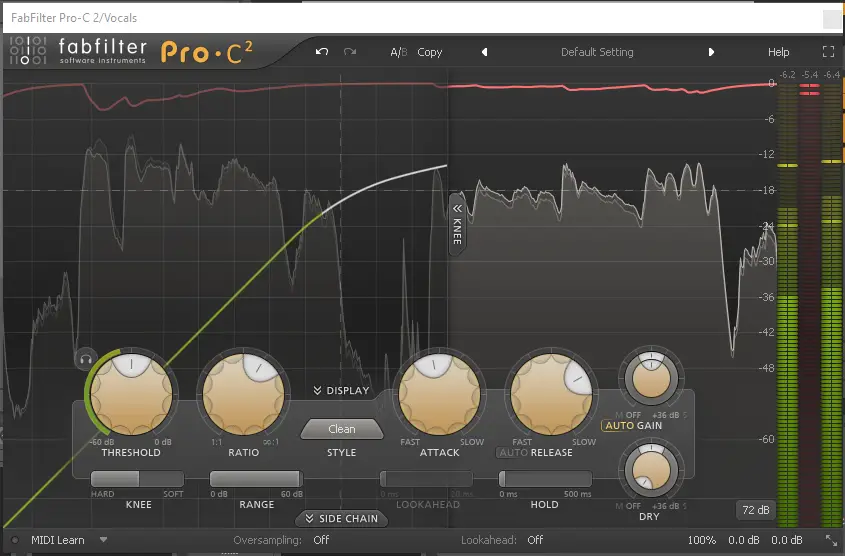
Compressor on vocals
Using a soft knee while compressing the vocals gives a transparent result. A ratio of 4:1 is considered best but you can experiment with more as well.
A medium attack and a little longer release is what this vocal needed and is also preferred.
Aggressive compression works negatively and is required when you don’t prepare the vocals for compression.
- Whatever you do, the most important thing is to look at the gain reduction at all cost. A maximum of 6 dB gain reduction will work fine on vocals with moderate settings.
9. Enhance the presence and brightness
After the correction and dynamic shaping are done, the vocals are good for the enhancements step now. Now you need to EQ your vocals so that they sound clearer, brighter and more present in the mix.
- The presence and clarity of the vocals resides in the 2 kHz to 5 kHz range. This also allows the vocals to cut through the mix. The brightness is above 8 kHz which is called the top end. The top end makes the vocal to shine and enhance the voice of the singer giving it a rich and velvety character.
Increasing these frequencies upto 4 dB to 5 dB can make the vocals sound clean, more upfront and high quality. This is the modern vocal sound.
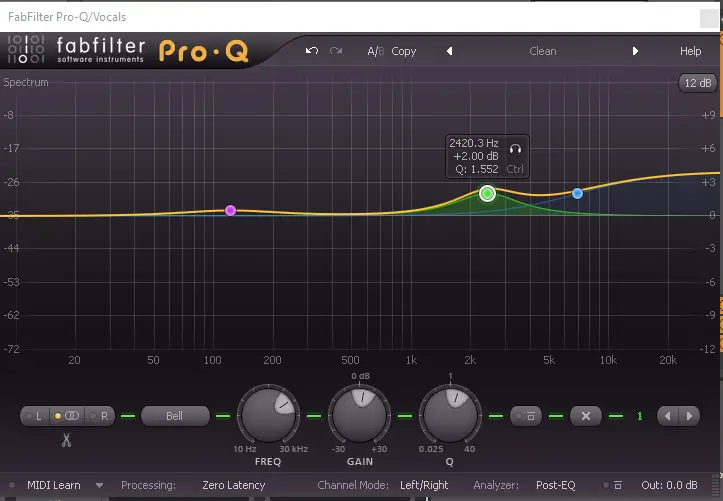
Enhancing clarity and brightness
Notice I have also enhanced the 120 Hz by half a dB with a wide Q in the bottom end just to give the vocal more depth. Although this is not necessary but it seemed to work in the type of track I was working which is a hip hop song so I did it.
- With this I want to tell you that you can even try and experiment by enhancing other frequencies that you feel your vocals need or will improve from but most importantly it should work well in the context of the whole mix. That’s the priority!
10. Enhance the unique frequency
Now with EQ, lastly, I look for a special characteristic tone in the vocal that I find to be interesting and unique in the voice.
This can also be due to the microphone the vocals were recorded with or sometimes the space that the vocals were recorded in.
I try to look for that unique character of the singer’s voice and add a little more to that.
- The singer may have a raspy voice, or he may have a deep chesty voice or he or she may have a breathy voice etc. In such cases I highlight the frequency that contains these unique touches of the singer by adding a couple of dB to it.
In this image you can see I have made a 1.5 dB bump with a narrow Q to enhance the microphone tone I was liking in the vocal.
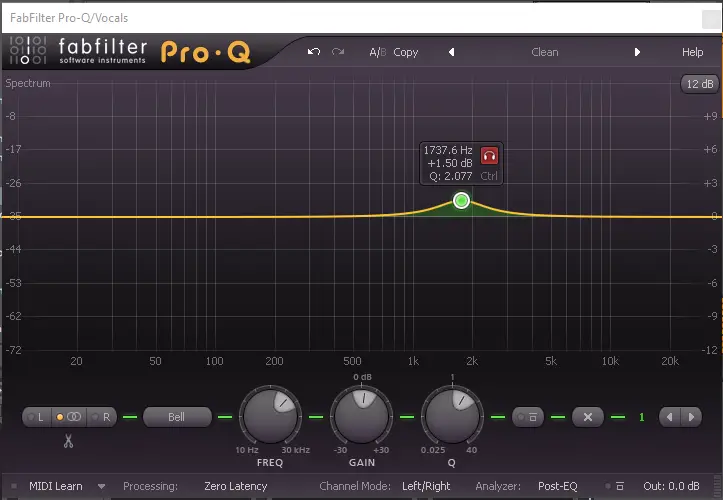
Enhancing the uniqueness
11. De-ess the vocal
This one is very important and is saved for the last one in the processing chain. A de-esser is a tool that takes down the sibilance of a vocal.
- Sibilance is the unbearable spike in the volume occurring when the words that contain the “s” sounds are spoken or sung which sound very harsh and piercing for the ears as they are of high pitch.
Sounds like sip, ship, see, so, sit etc. contain sibilance frequency.
For reducing this effect a de-esser is used. It has the main controls like a compressor – a threshold, a range, and a frequency selection fader.

Sibilance removal with a De-esser
Whenever the sibilance crosses the threshold, the de-esser ducks it down till the range that has been selected.
Check out if you haven’t already –
Apache Essentials Drum Sample Pack
Conclusion
With these steps it must be now clear to you that EQing vocal is not that tough of a task. If you know what you want to achieve, it becomes easier to progress in that direction.
I again emphasize on the Step 2 of this article that you need to visualize first regardless of the tools and strategy you will use thereafter. Once you hear it in your mind, you will be able to work that out easily.
And lastly, don’t forget to experiment with these steps.