Contents
How To Master A Song In Ableton Live
Mastering is the final touch added to the song to make it stand tough in a competitive environment where it’s lined up with all the other commercial tracks. It’s also the last chance to make any change in how the record sounds and the first step in the distribution process of the record.
Mastering is the last chance to catch any mistake in the record and then rectify it. After the record leaves, there shouldn’t be any flaw in the record.
To master your song, literally every DAW is capable. We will be using Ableton Live. The only requirement is to have a clear picture in your mind of where you are and what you are going after. You also need to have a good ear to identify the aesthetic sound of a song. Don’t worry we’ll talk about it in the following steps..
We’ll proceed with the steps first and then the other important stuff.
Also Read – 31 Mastering Tips – From The Best Mastering Engineers!
Remember, mastering is best when it requires the least amount of processing and steps. If you require more, it actually has to do with the mixing.
Buckle up.. we’re mastering..
Steps to master the song in Ableton Live include –
- Correction – the the first step.
- Then comes compression.
- Stereo processing.
- Use saturation.
- Use reference track.
- Limiting the master.
- Dithering for distribution
Before we start, let me introduce you to our –
Make sure to check it out.
Also Read – Is Mastering Necessary?
1. Correction Using An Equalizer
The first step when you master a song is to use the corrective equalizer. More often than not, small studio owners have a way too much bass in their mix down. It can also be other way around. Using an equalizer you can correct that imbalance and also if something sticks out to you can be corrected.
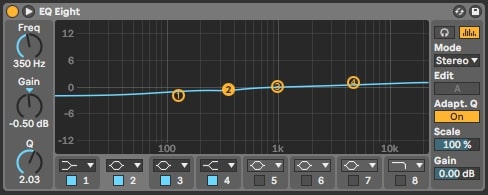
Equalizing the master in Ableton Live
Mastering needs cutting more than boosting. Cutting frequencies require a narrow bandwidth and boosting requires a wider one. Common area to clear is the low mid for clear bass or for separating the lead vocal from bass. Low end is another area to perfect during mastering.
Also Read- How To EQ Vocals Correctly In 11 Easy Steps – With Pictures
The maximum amount of cutting and boosting is 1 dB. Mostly half a dB is all that is needed. Changes more than these amounts disrupt the balance very much. Broad Q with a little amount of gain change is preferred.
A quick recap for equalizing the master in Ableton Live:
- Mastering engineers cut more than boosting.
- Cut = narrow bandwidth, Boost = wider bandwidth.
- Common area to clear = low mid, low end.
- The maximum amount of cut and boost = 1 dB
- Broad Q with little Gain changing.
Related – How To Mix A Song – 17 Steps That Engineers Do
2. Use Compression
In the case of mastering, mastering engineers least prefer to use compression on the master. If at all, they may use it to gel or glue the master just a bit.
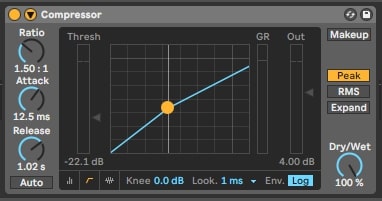
Ableton Live Compressor
You should aim for the ratio of about 1.2:1, 1.5:1 or a maximum 2:1. Remember a 2:1 ratio is an extreme setting when mastering.
The gain reduction should be as low as 2 to 3 dB maximum. More often it’s about a half dB gain reduction. The threshold should be kept high. Attack and release should be on a medium setting.
Also Read – Mixing With Compression – In 13 Steps
Always set the compressor at the loudest or the busiest section of the song. This will prevent the compressor to have the least artifacts as compared to working in an opposite way to this.
A quick recap for using the compression during mastering:
- Subtle use only to glue the record.
- Maximum 2 to 3 dB gain reduction. More often it’s half dB.
- Low ratio a maximum 2:1 ratio. high threshold
- Always set the compressor at the loudest or the busiest section.
3. Finesse The Stereo Processing
A good wide stereo image of your song adds richness and provides an immersive experience to the listener. During the mastering process, you can enhance the stereo image by the mid side option of the EQ in Ableton Live.
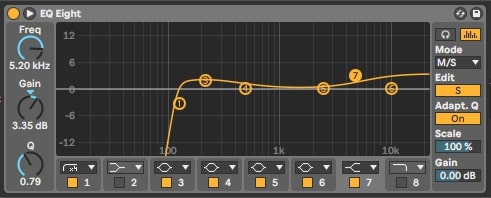
Stereo processing in Ableton Live
Simply use the side option as shown in the image above – Mode is M/S and Edit is set to S. Increase the gain of frequencies above 120 Hz accordingly but be very moderate. Here for the sake of demonstration I have exaggerated it.
The frequency below 120 Hz is best when kept mono.
- In case of widening a mono sound like the kick and bass etc. with a stereo enhancer, it shifts the timing of the same signal coming from the left and the right speakers. In other words, the mono signal is split into left and right signal having a slight shift in timing (microseconds) between them so that they arrive at your ears at different time and create a sense of wide image.
This also adds a risk of phase cancelation if done too much. This makes the sound disappear from the record which does more harm than adding value so you need to check the results and keep it subtle.
4. Use Saturation
Saturation is used to color the master. Saturation also increases the perceived loudness of the track.
All that saturation does is adding harmonic content by introducing distortion into the sound. The frequency that is not in the original sound gets introduced with saturation. This makes the sound richer and fuller.
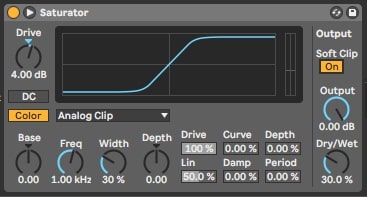
Saturating The Master In Ableton Live
Saturation in the mastering comes after the compressor. This is good as a guideline at least because by no means I say that it is fixed. You can experiment if the other way sounds good and then go with it jus keep it very subtle. Saturation should be felt and not be heard.
Also Read – How To Bass Saturation – The Easy Way!
Saturation done correctly, increases excitement in the sound and make it more vibrant and gives it character. It gives presence to the the track, makes the low end sound warm and huge. Gives sheen to the high end and makes the drums more punchy.
These are all the different characters that saturation can give to your track depending on its type.
In Ableton Live’s saturator, there are different saturation types. You can experiment to check what sounds best on your track and use that.
Also Read – Saturation Before Or After Compression – Explained
5. Use Reference Track
Reference tracks are highly important while mastering. They are the definite means to calibrate your ears regardless of the medium you are hearing on. The reference track is obviously the tracks that are released commercially and should be in the genre that you are into.
Reference tracks are very well balanced in every way which will serve as the goal for your song.

Using Reference Track In Ableton Live
Study all the aspects of it in all the sections. Pay attention to the verse, chorus etc. Learn its frequency content and stereo width objectively. Try to mimic that quality into your song.
Keep the levels low when you start with the reference track. In the beginning you should aim to achieve the tonal balance like the reference track. After that is done go for the levels. This is the right way to work with a reference track.
6. Limiting The Master
The limiting is pretty straightforward when it comes to mastering. Limiters are used to draw a boundary to prevent the audio from going into distortion by setting the ceiling. For the obvious reason, the limiter is the last thing in the mastering chain.
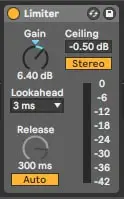
Limiting the master in Ableton Live
There are two ways in which you can work with the limiter.
The first way is to raise the level of the signal till it reaches the ceiling of the limiter. The second way is to adjust the limiter threshold so that the signal reaches the ceiling of the limiter. Both the ways are accepted to work with.
Always set the limiter at the loudest section of the song while mastering. This will save you the distortion and the loss of clarity in your song that a limiter may introduce if it is set based on a quieter section.
One important thing to keep in mind is that the low end affects the limiter essentially. Due to this, the limiter reacts mostly to the low end and restricts it thus the energy in the low end gets compromised due to excess limiting. It will also tend to make the high end unpleasant by distorting it.
Short release setting will increase the sharpness in the sound while a longer one will smooth it out.
7. Dithering For Distribution
Dithering is the way to introduce noise or random signal into the master to randomize the quantization error that gets introduced at the time of bit depth reduction which is inevitable during distribution. It is used as the last step in the mastering process and exactly at the time of export.
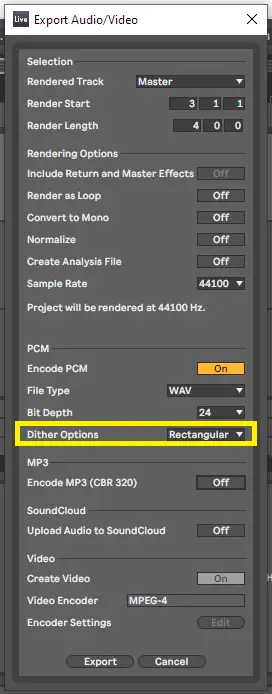
Dithering in Ableton Live
If you are about to distribute the track in a compressed format over the internet through streaming services or downloads, you should use Dither.
When the bit depth is reduced while the file compression takes place for distribution, distortion is heard which is due to the quantization error. To reduce this distortion from being perceived, noise is introduced. This noise has different types like rectangular, triangular etc. All of these shapes have different tonalities.
Now the other important stuff…
Preparation For Mastering
- Monitoring system.
- Listening environment.
- Visualizing the end goal.
Lets have a look..
Monitoring system
A good monitoring speaker system is one of the prerequisite to a good master. The monitor which is relatively neutral is a good one. It should not exaggerate any part of the frequency spectrum but sound relatively flat.
It should be phase accurate which means that if there’s a mono sound in record, it should arrive at perfectly the same time from both the speakers to your ears.
A good monitoring system has no distortion and no coloring so that you hear only what is in the record and not what’s not there.
Headphones are very important when you are mastering at home. They provide you full privacy and are required to check the low end and the stereo image very precisely. All the finer details that may get overlooked on the big monitor sets can be zoomed in with the help of a good monitoring headphone pair.
Also the need to check on various speaker systems to get an overall picture of your master at the end of the day is very crucial to check if it performs well and acceptable on all of them.
Listening environment
Whatever you are hearing should come directly from the speakers and not be the reflection from the walls and objects in the room, that’s what a perfect listening environment is.
Also the environment needs to be very quiet. You should be able to hear the quietest detail possible, the reverb’s tail and all the way into the noise floor as well.
The mastering room needs to be of the size where the low frequencies can properly propagate into and you can hear them clearly without reflections.
Visualize the end goal
This is important. Before you begin mastering, the end goal should be in your mind. This will save you any confusion about what you should be doing.
Having a direction obviously helps you to reach there fast and hassle free.
By having an end product in mind you will start in a particular way, you will make adjustments in a particular way which will all lead to your goal. This is the most efficient practice that you could ever follow.
Apart for these, there is also something else when mastering is considered..
Related Topic – 41 Mixing Tips – From Grammy Winning Engineers
Different Mastering Approach For Different Genre
Although mastering is conceptually the same for every song but there are factors that create minute differences that sets apart one genre or style from the other.
There are also some set boundaries regardless of the genre like – too much bass or too much highs etc. You anyhow need to be within those always but still there are different approaches depending on the genres.
For example in a reggae song the bass leads the record whereas in a heavy metal song, there’s aggression, the stereo image should be wide enough in the guitars, there needs to be depth which is with the reverb and delays used in the record etc. Classical music on the other hand thrives essentially on the dynamic range!
All these approaches set the genres apart from each other slightly that help bring out the maximum amount of emotions contained within them.
Also Read – Why Is Mastering So Expensive
Conclusion
Mastering being the last step towards perfecting your art should be taken very seriously. As the saying goes, “the last should be the best”, try giving as much effort as possible and learn the art of perfecting the song at this stage. Make it as best and competing with the commercially available tracks. It may take some time.
Have patience and listen more and more commercial music to learn from them!
One thing to note while mastering is that even if you put in the maximum effort that is humanely possible, no mastering can save a bad mixed song in the first place. The best master can only result from the best mix.
So as obvious as it is, a good mix is the prerequisite to a good master. Also mastering should require the least effort and steps.