Contents
How to Produce Music on Phone?
There are people making award winning movies on their phones proving the power of smartphones in media production. Since phones have really become functionally superior now, Music Production on them has got really easy and handy.
Here are the steps to produce music right on your smartphones–
- Download a music production app on your mobile phone.
- Understand the interface and how it works.
- Decide the genre.
- Start with a readymade template of that genre if the app has or start a new project. A template saves time.
- Get your own samples or start with the app’s preloaded samples or virtual instruments. We’ll use virtual instruments here.
- Start with setting the tempo.
- Now do the drum programming or chords. This is totally up to you.
- If you started with the drums, program the bass next to make a foundation of the groove.
- If you started with the chords, program the bass or melody. For a melodic foundation. Next, program the drums.
- After your drums, bass, chords and melodies are done, check for instruments if you want to change any.
- Put some sound effects.
- Mix and master them.
- Export your song.
Following these steps, you can pretty easily produce music on your phone.
Now let’s look into the details of each step..
Before we start, let me introduce you to our –
Make sure to check it out.
Downloading a Music Production Application on Your Smartphone
There are a number of apps for music production on your smartphones.
I have picked BandLab for the sake of this tutorial.
You can choose from any of the free ones out there.
Just search on google for free music production apps and I bet you’ll find a few of them to start with.
BandLab is a well known music production software and is used by many people.
- Even if you get any other app, the workflow and the steps will be more or less the same. You only need to learn the interface of the app.
Also read – How to Record Vocals on Phone Professionally in 8 Steps!
Understanding the Interface of The Music Production App
An interface of the app is what you see and interact with in that app. All the buttons and sliders and the design comes in interface.
Often apps come with a tutorial for teaching you the software directly into it or it may have a video link for that.
Just watch whatever is available and I guarantee you it is going to be easy! So don’t worry!
The minimum you should know is-
- Create a new project.
- Changing tempo.
- Add tracks.
- Insert instruments and samples.
- Program midi notes.
- Placing samples in the grid.
- Controlling parameters of the individual tracks like panning and volume.
- Mixing the tracks with levels.
- Working with the master.
Knowing these things in the app will be all that you need for producing tracks on your smartphone.
Creating a New Project
When you first open BandLab, it opens its home page.
At the bottom, find the plus button to add your new project.
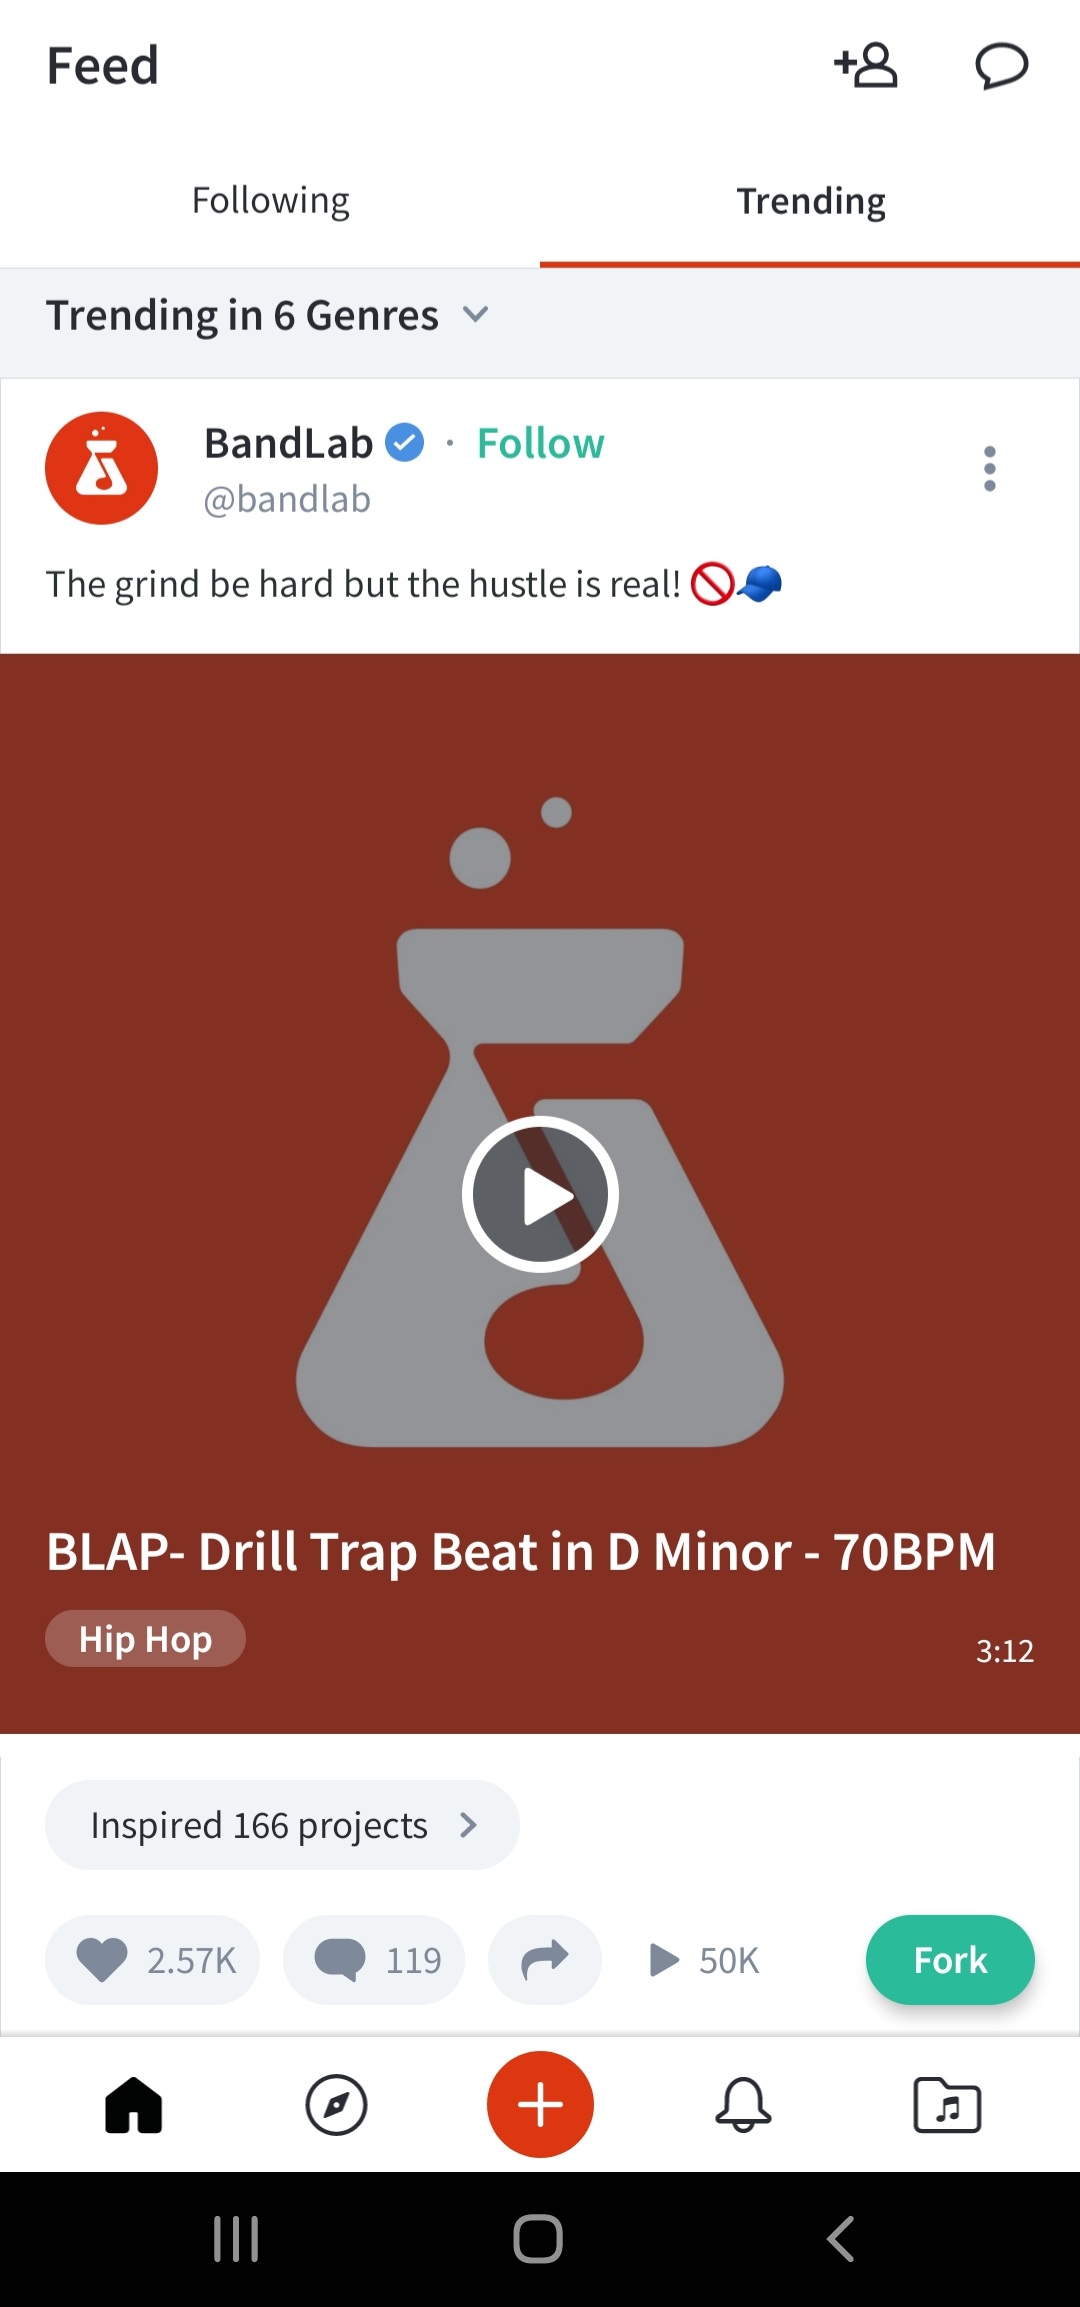
BandLab Image 1.1
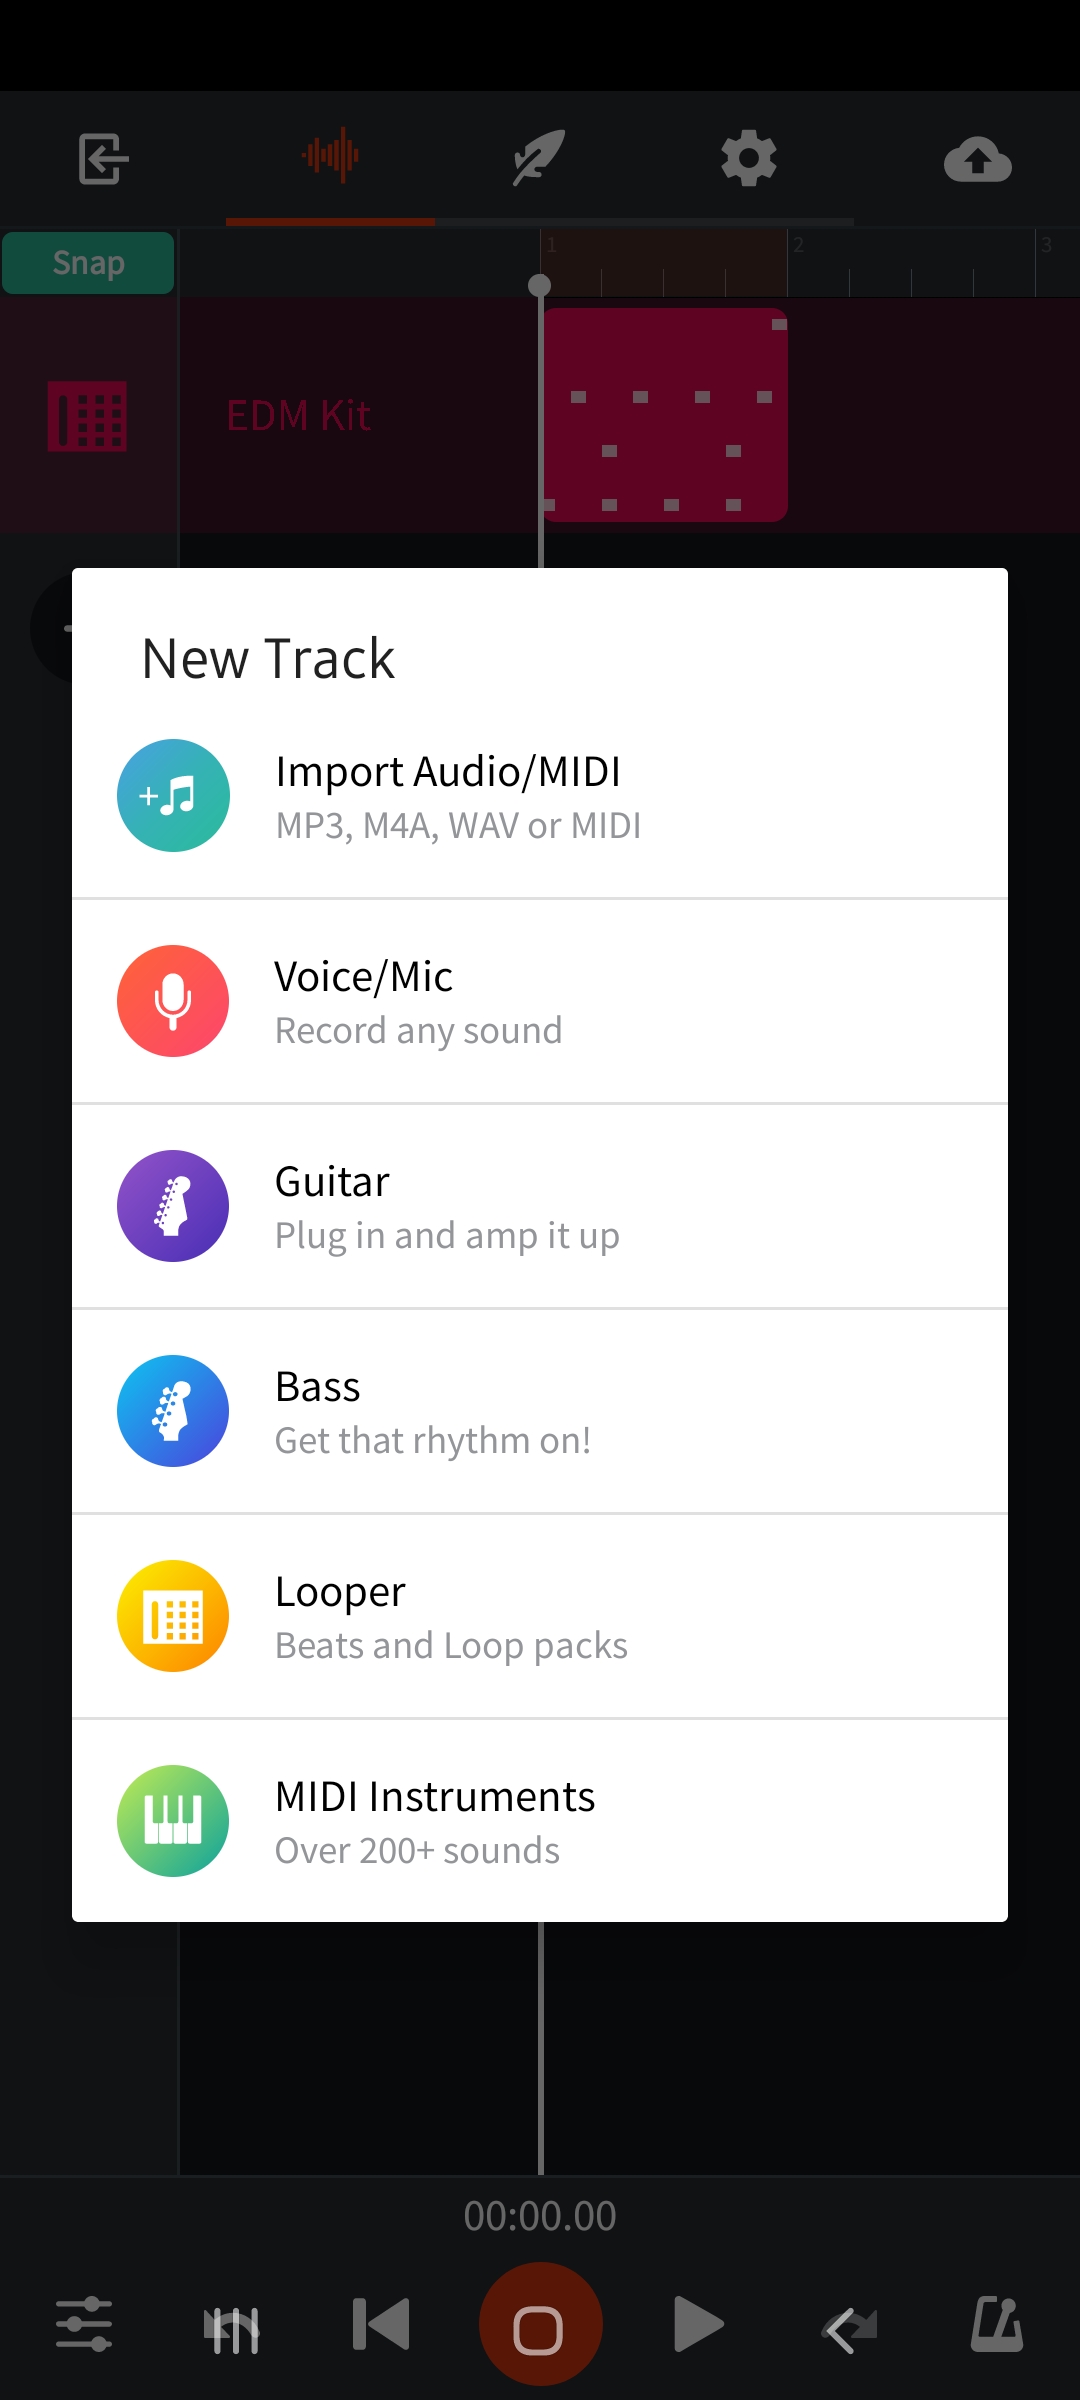
You’ll see some boxes- Voice/Mic, Looper, MIDI Instruments. Slide the boxes to right. Select MIDI Instruments.
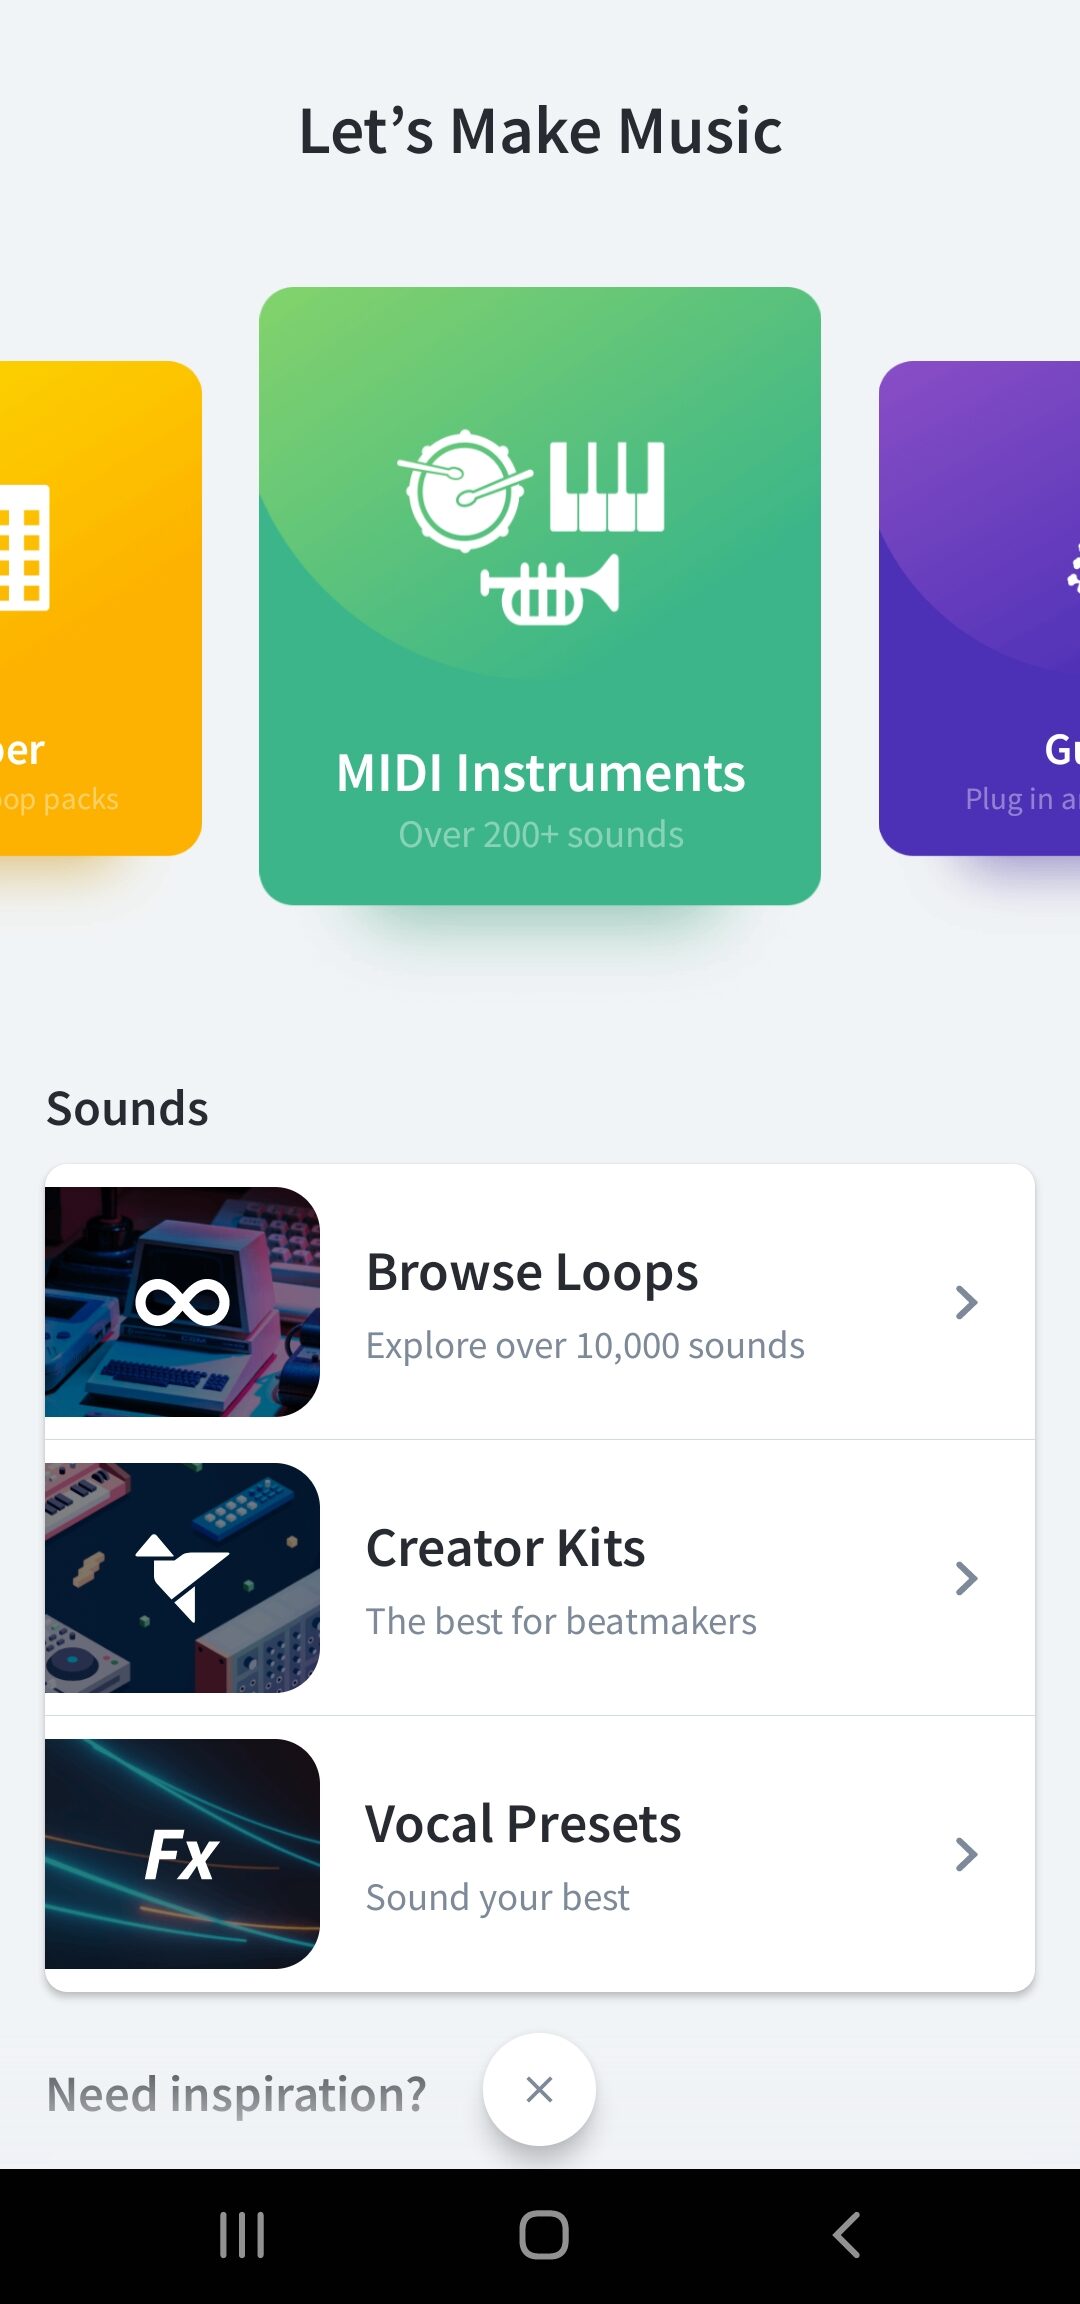
BandLab Image 1.2
Selecting the Drum Kit
After selecting the MIDI Instruments, on the next screen select Drums.
You’ll find this option on the top thin Menu Strip right below the MIDI Instruments title bar.
Slide to right for Drums and select it.
A list of Drum kit will appear.
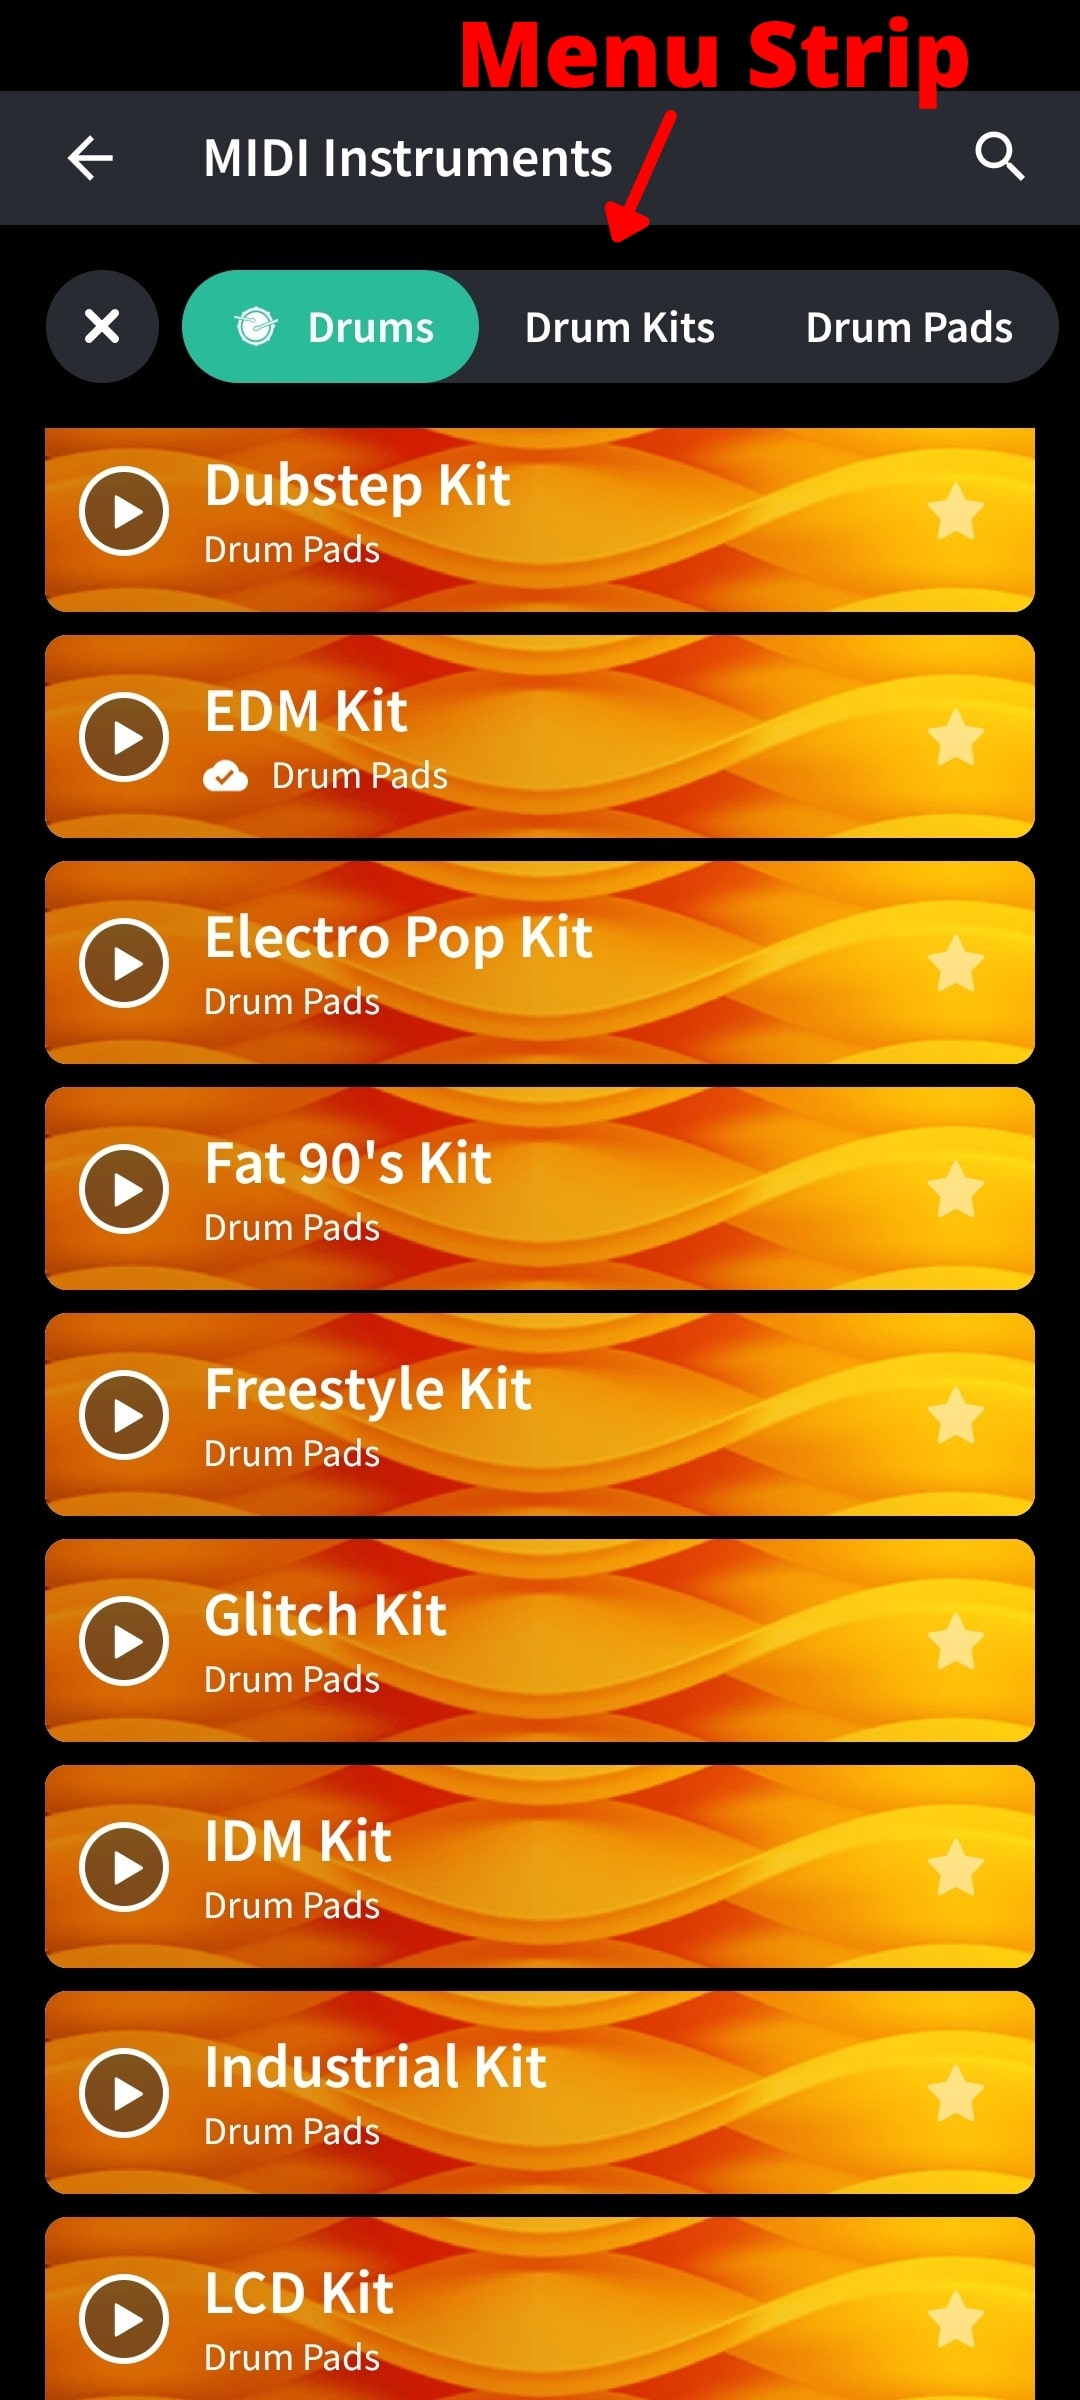
BandLab Image 1.3
Now after listening to the drum kits with the play button on them, select any drum kit and download by tapping on it.
Let’s go with the EDM Kit, scroll down to find it.
After it is downloaded, tap the kit again and a drum pad screen will open.
These pads can be tapped to hear the individual drum hits.
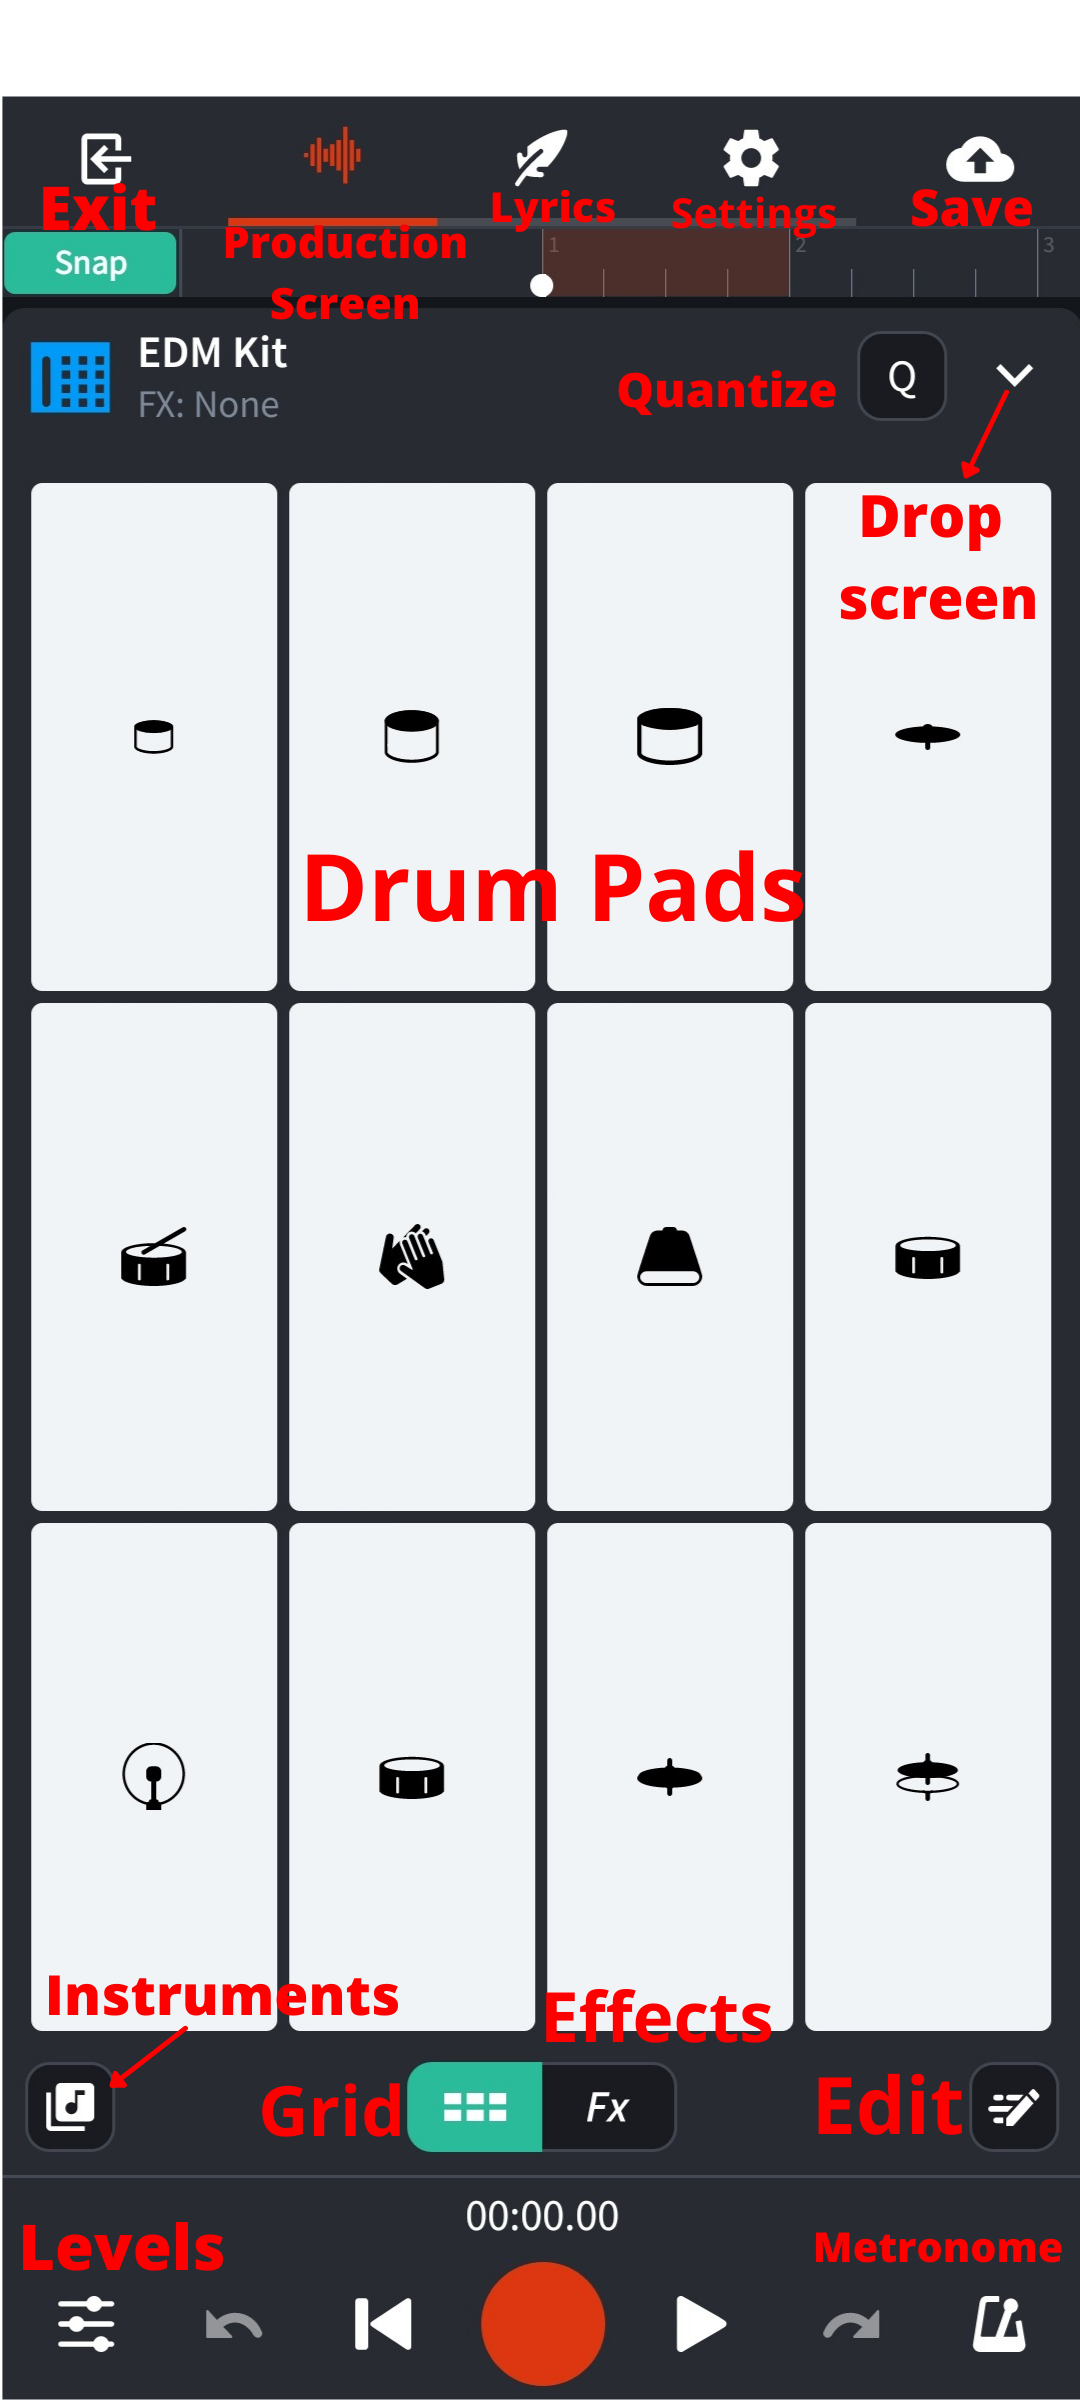
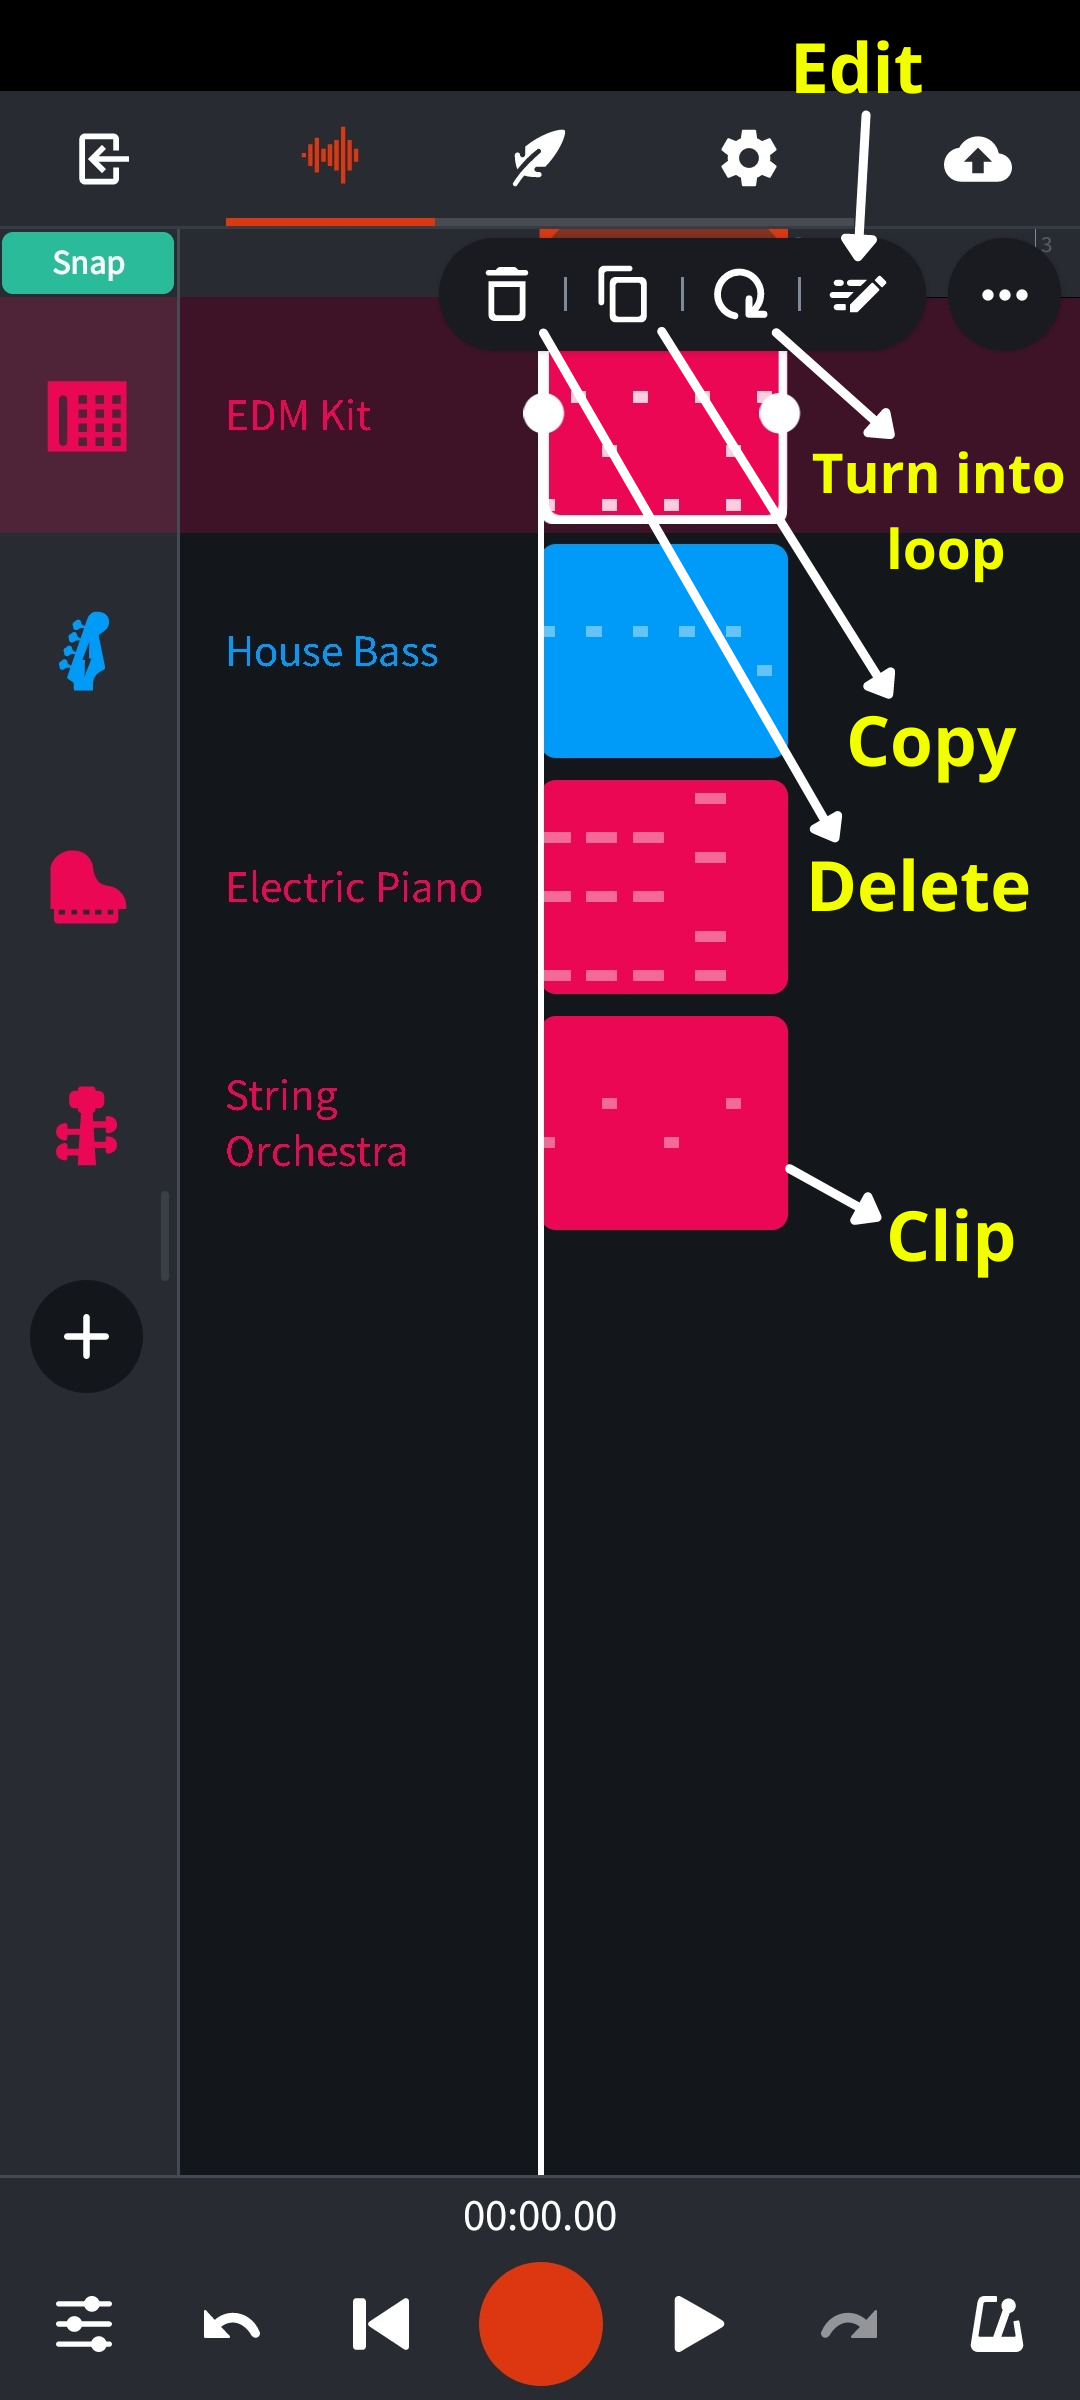
BandLab Image 1.4
- Above is the programming screen and the controls, refer this for carrying out further steps.
Adding Effects
If you tap on FX as shown in image 1.4 , you can add effects like reverb, delay, chorus, flanger and lot more.
Tap FX, now a box having None appears on the next screen.
This means no effect selected yet.
Tap ➕ icon on the box then Explore effects.
Now select any effect from the listed ones. You should explore this section.
Tap back to return.
Effects list screen-
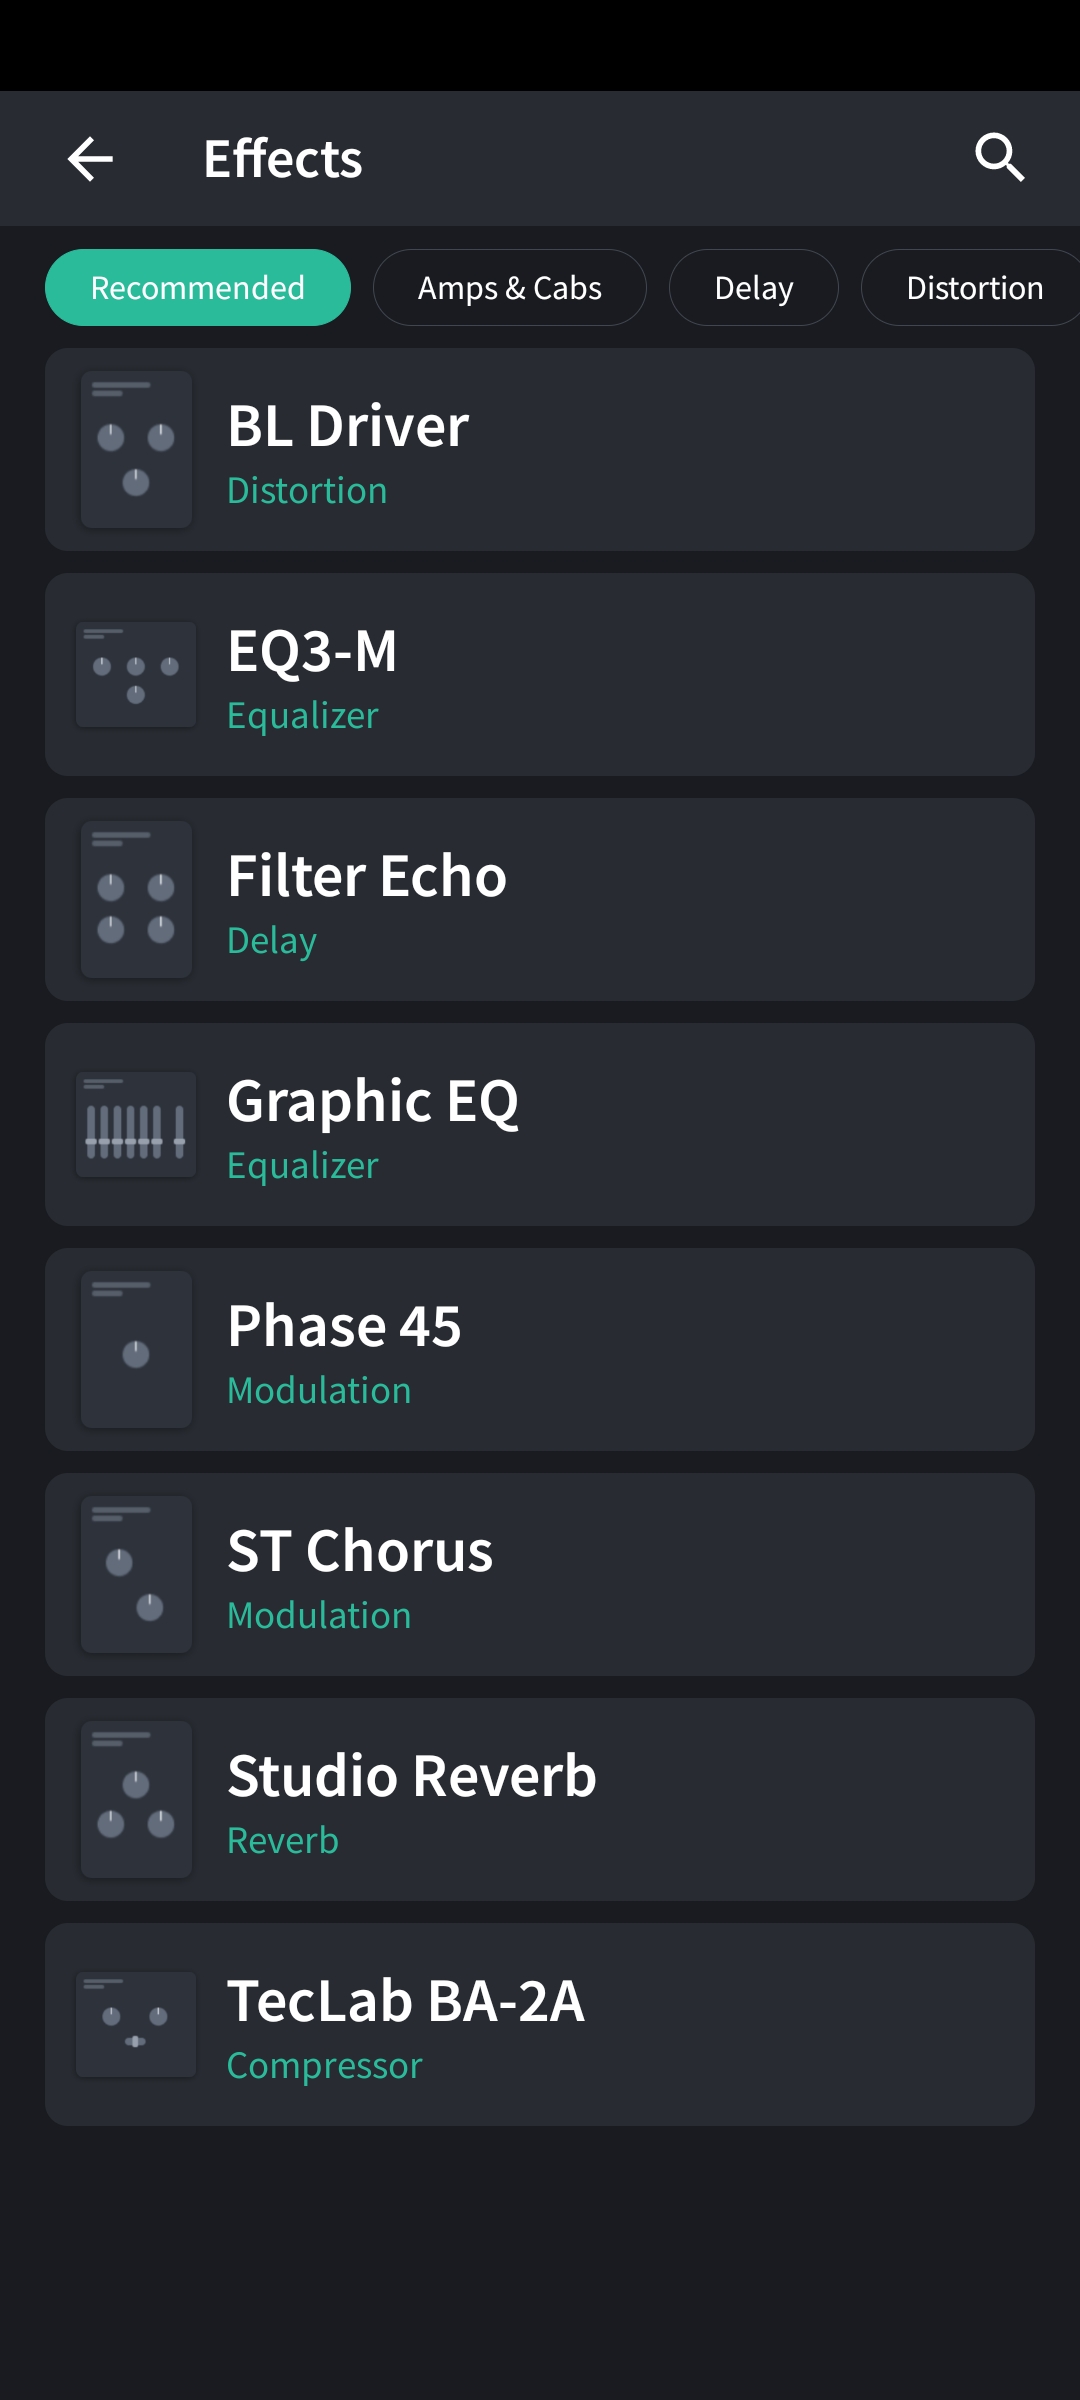
BandLab Image 1.5
- These are a few of the effects. You can check all the effects by tapping on the categories on the top- Amps and Cabs, Delay, Distortion and more.
Set the Tempo
Open settings by pressing the Gear icon on the top menu and adjust the tempo of the track with the ➕ and ➖ buttons.
Select 128 A tempo is the speed of your song.
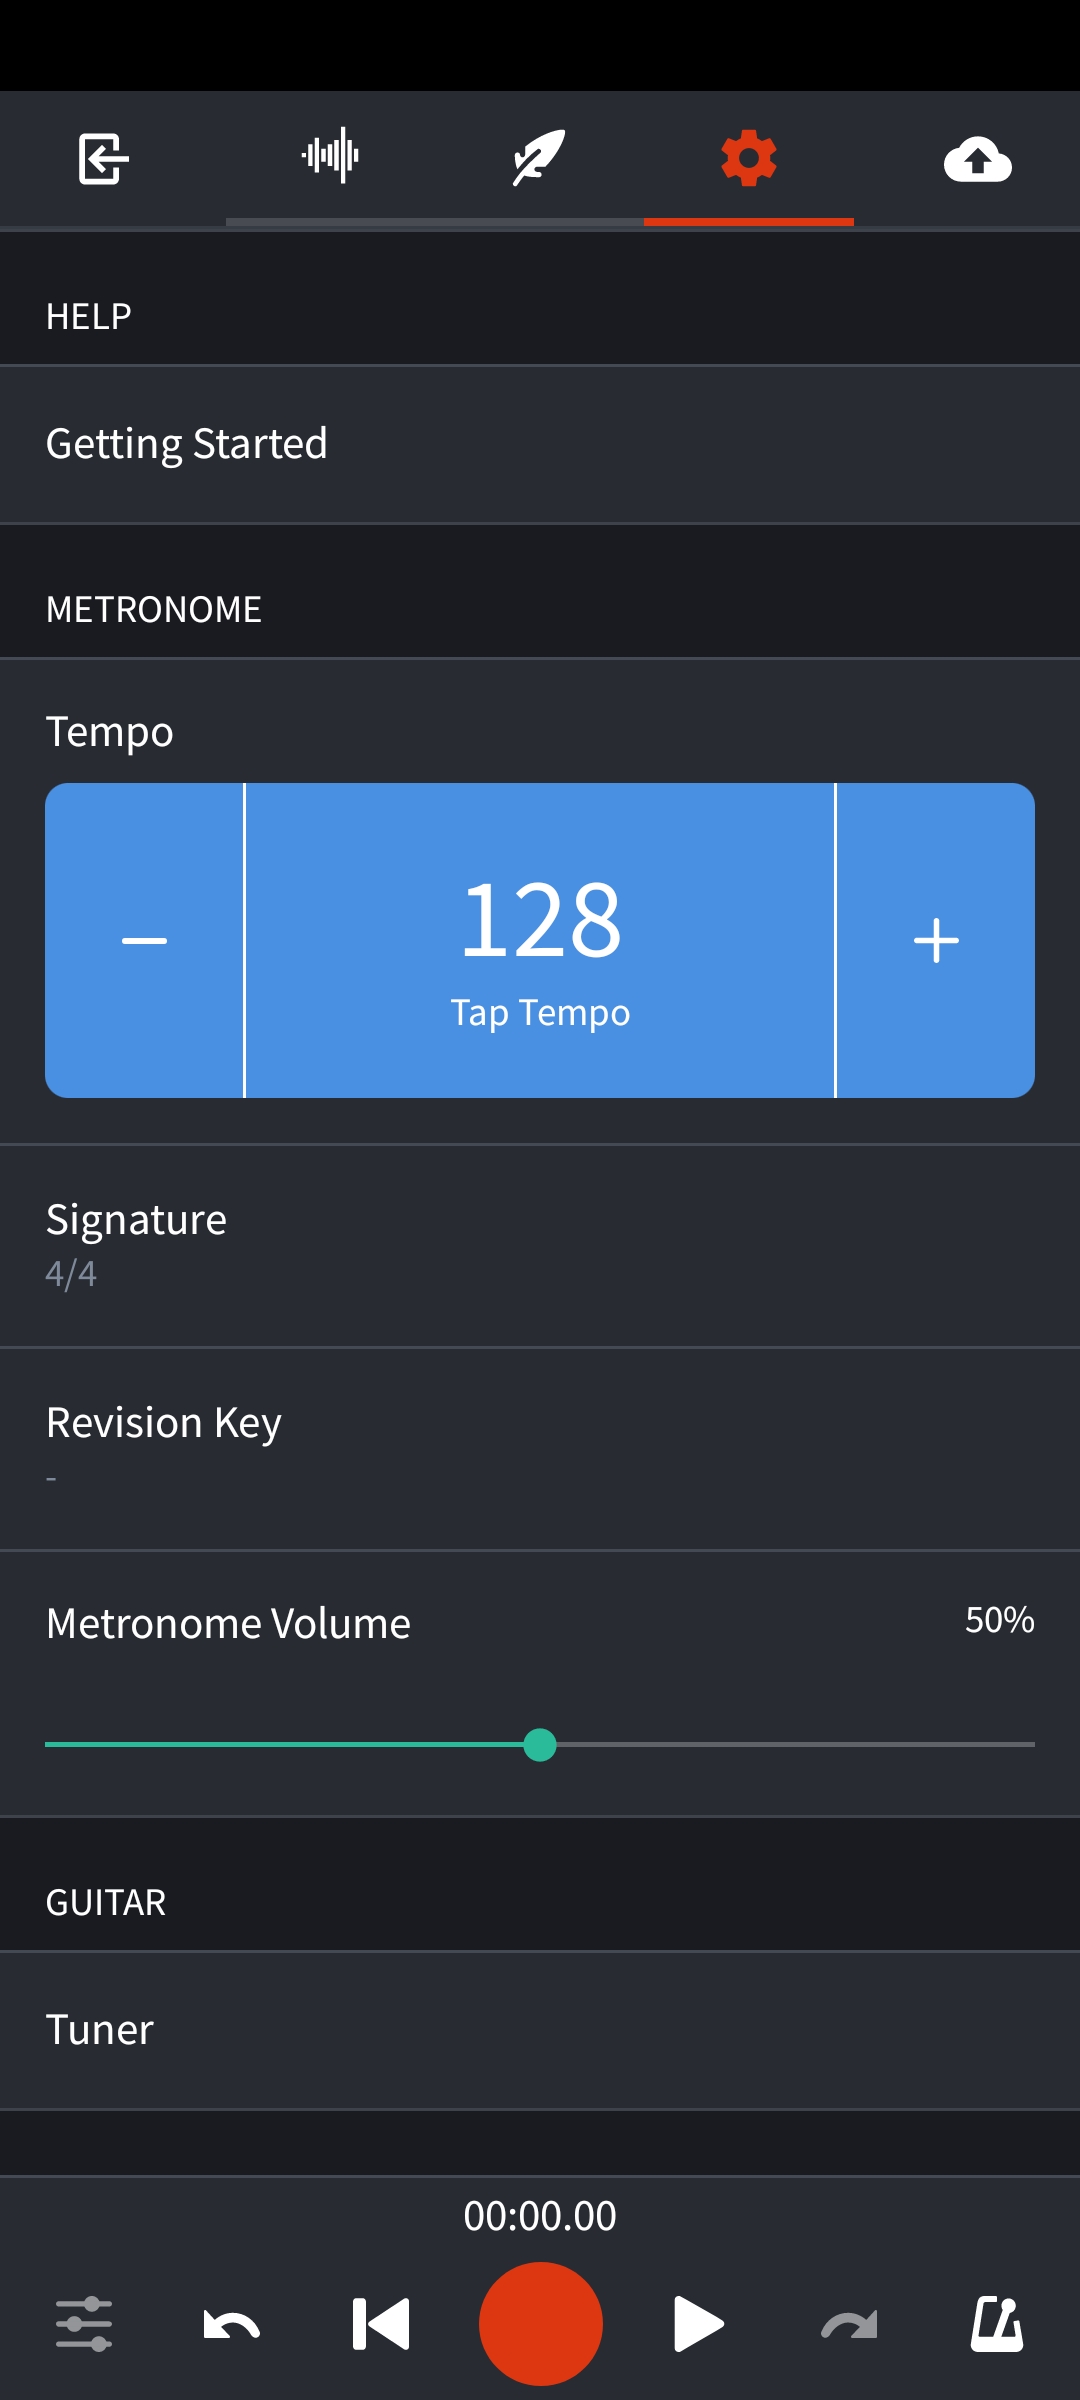
BandLab Image 1.6
- Tap the waveform icon on top (second from the left) to come back to the Drum programming screen.
Programming Drums
You can press record (press the red circle at the bottom in the middle when you are at the image 1.4 screen) and start playing your drum pattern so that it gets recorded.
Or you can program the pattern in the MIDI editor.
To open the MIDI editor, press the bottom right edit icon.
Now a grid opens with the drum icons to the left most portion of the screen.
You can hear them by clicking on them.
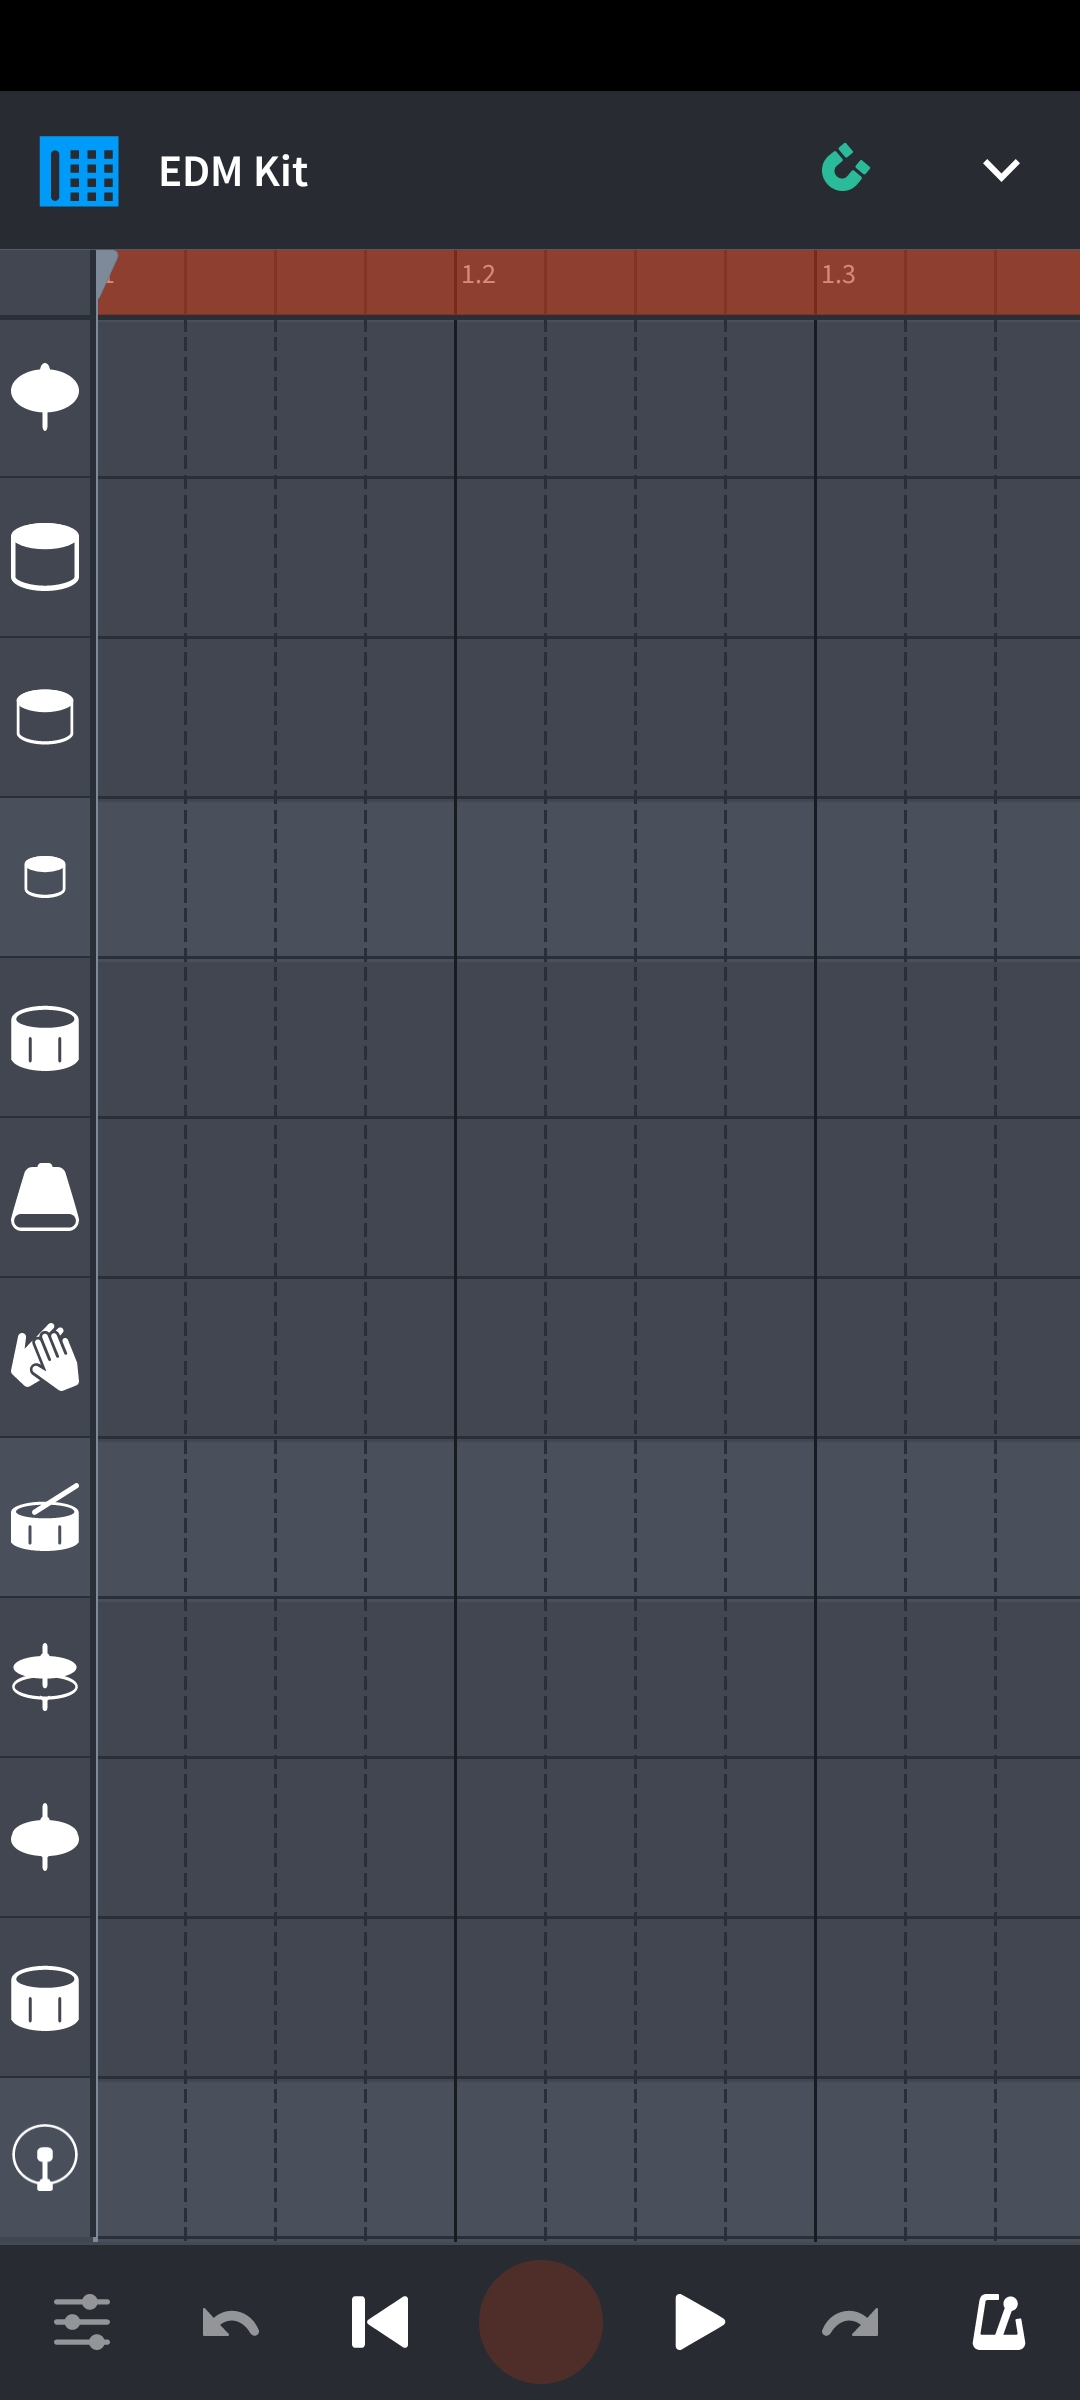
BandLab Image 1.7
Now tap in the square cells and make a pattern like shown in the image.
You can even program your own pattern if you are familiar with the MIDI programming.
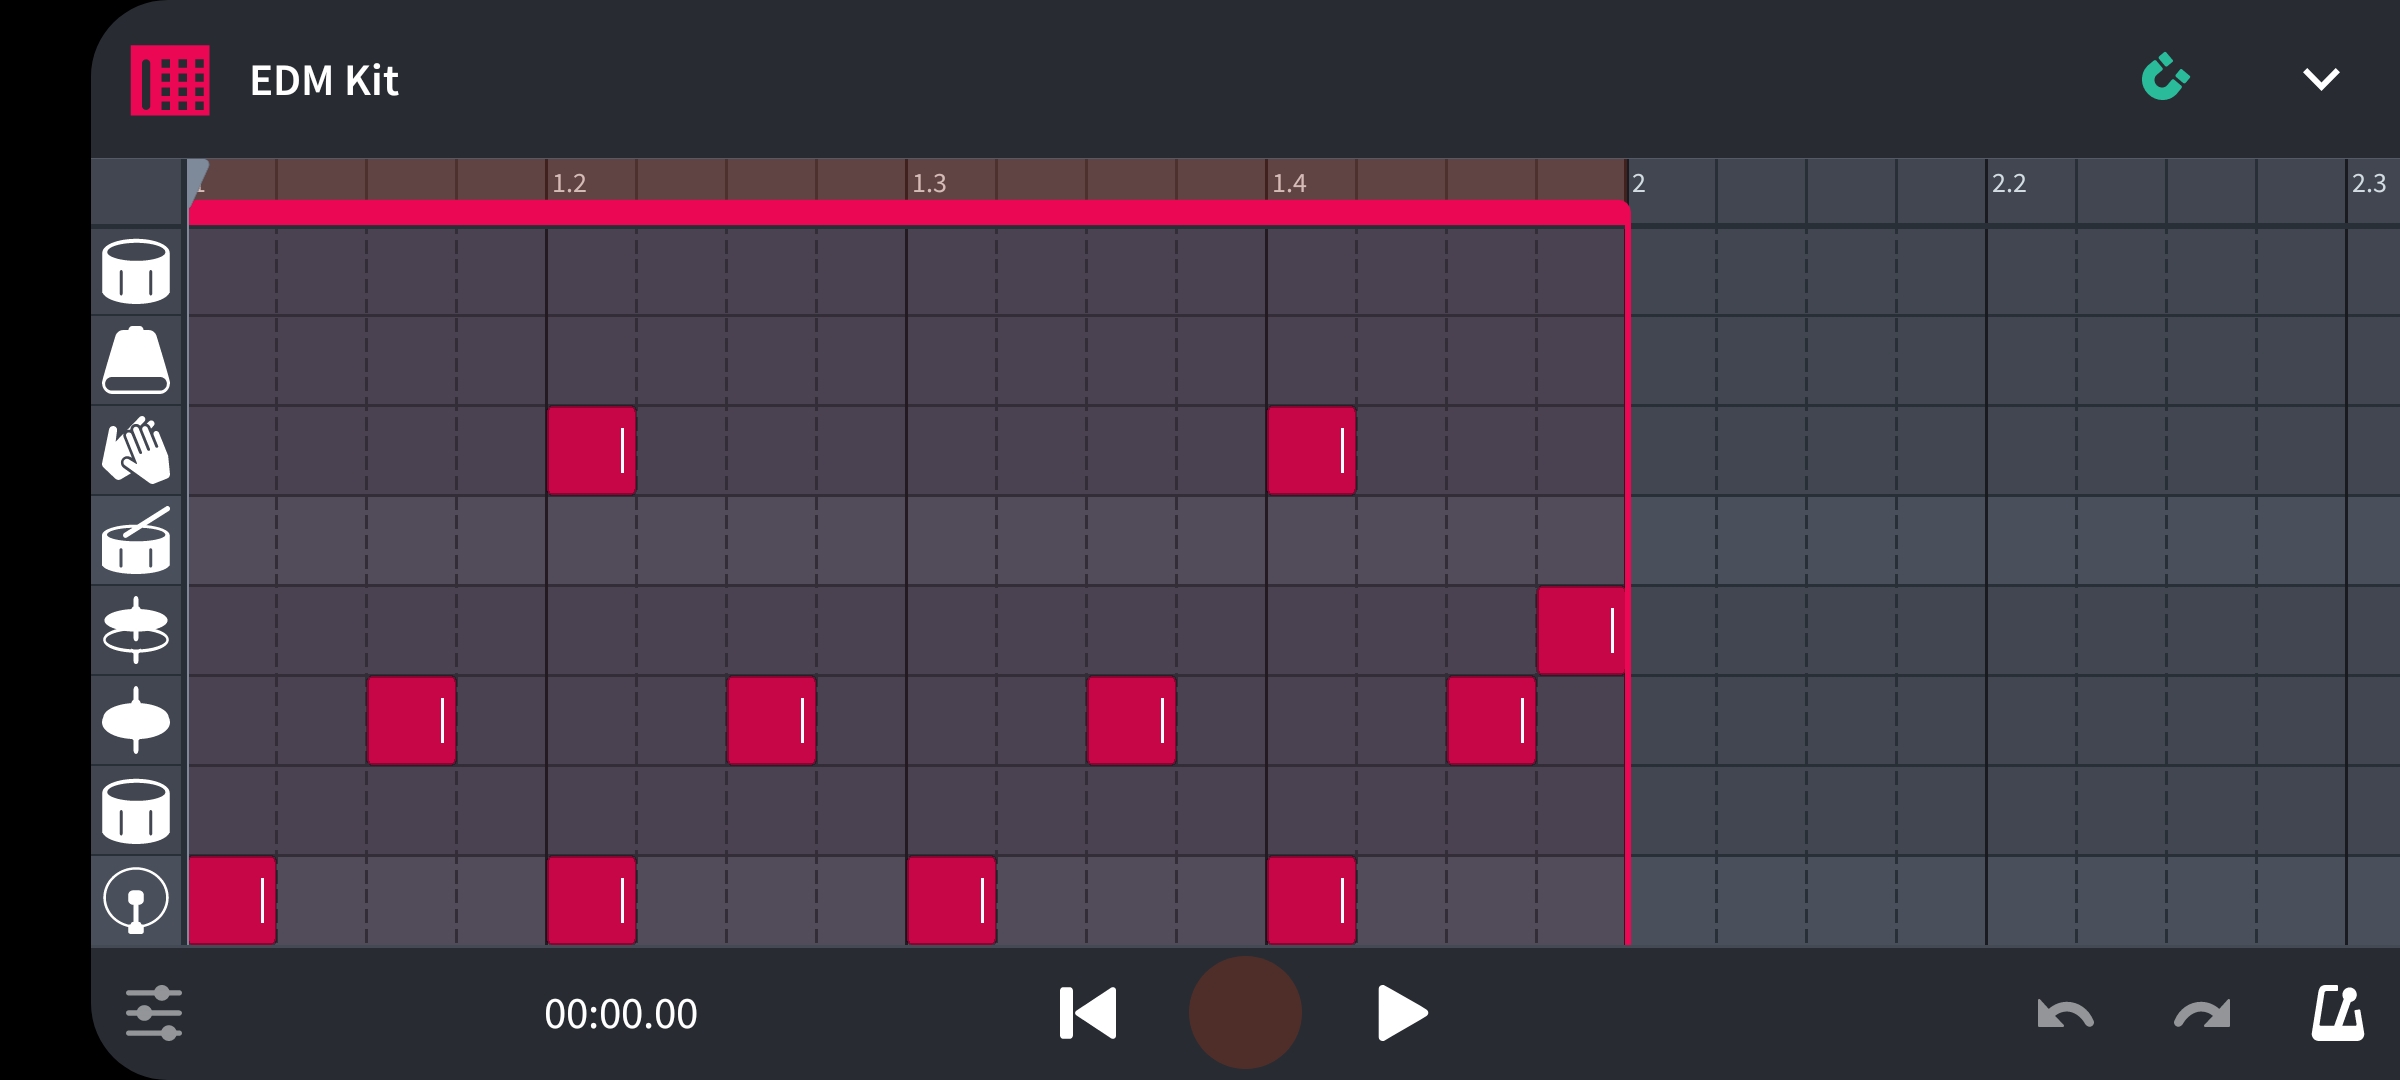
BandLab Image 1.8
- If you are a beginner, this is a good time to learn. Just try and make mistakes. Make a pattern and play it by pressing the play button at the bottom. With a little trial and error and with practice you’ll get the hang of it.
Adding Bass
After the drums are done, its time for other instruments.
Press the top right drop screen symbol in the shape of the letter “v” located beside the magnet icon.
Now the drum pad screen appears, again on this screen, press the same drop down symbol besides the “Q” icon.
Now this is the screen where you can add more instrument by pressing the plus ➕ icon.
- The box in the drum layer is called a Clip. Every box in the track is called a clip.
Let’s add bass.
After you press the ➕ icon, a box appears for adding New Track.
Select MIDI Instruments, look at the bottom of the box.
BandLab Image 1.9
Select Basses from the same top Menu Strip (image 1.3) from where you selected drums before.
Now select a bass. We’re selecting the House Bass here.
Now make a bass pattern through MIDI programming again.
Copy as shown in the image.
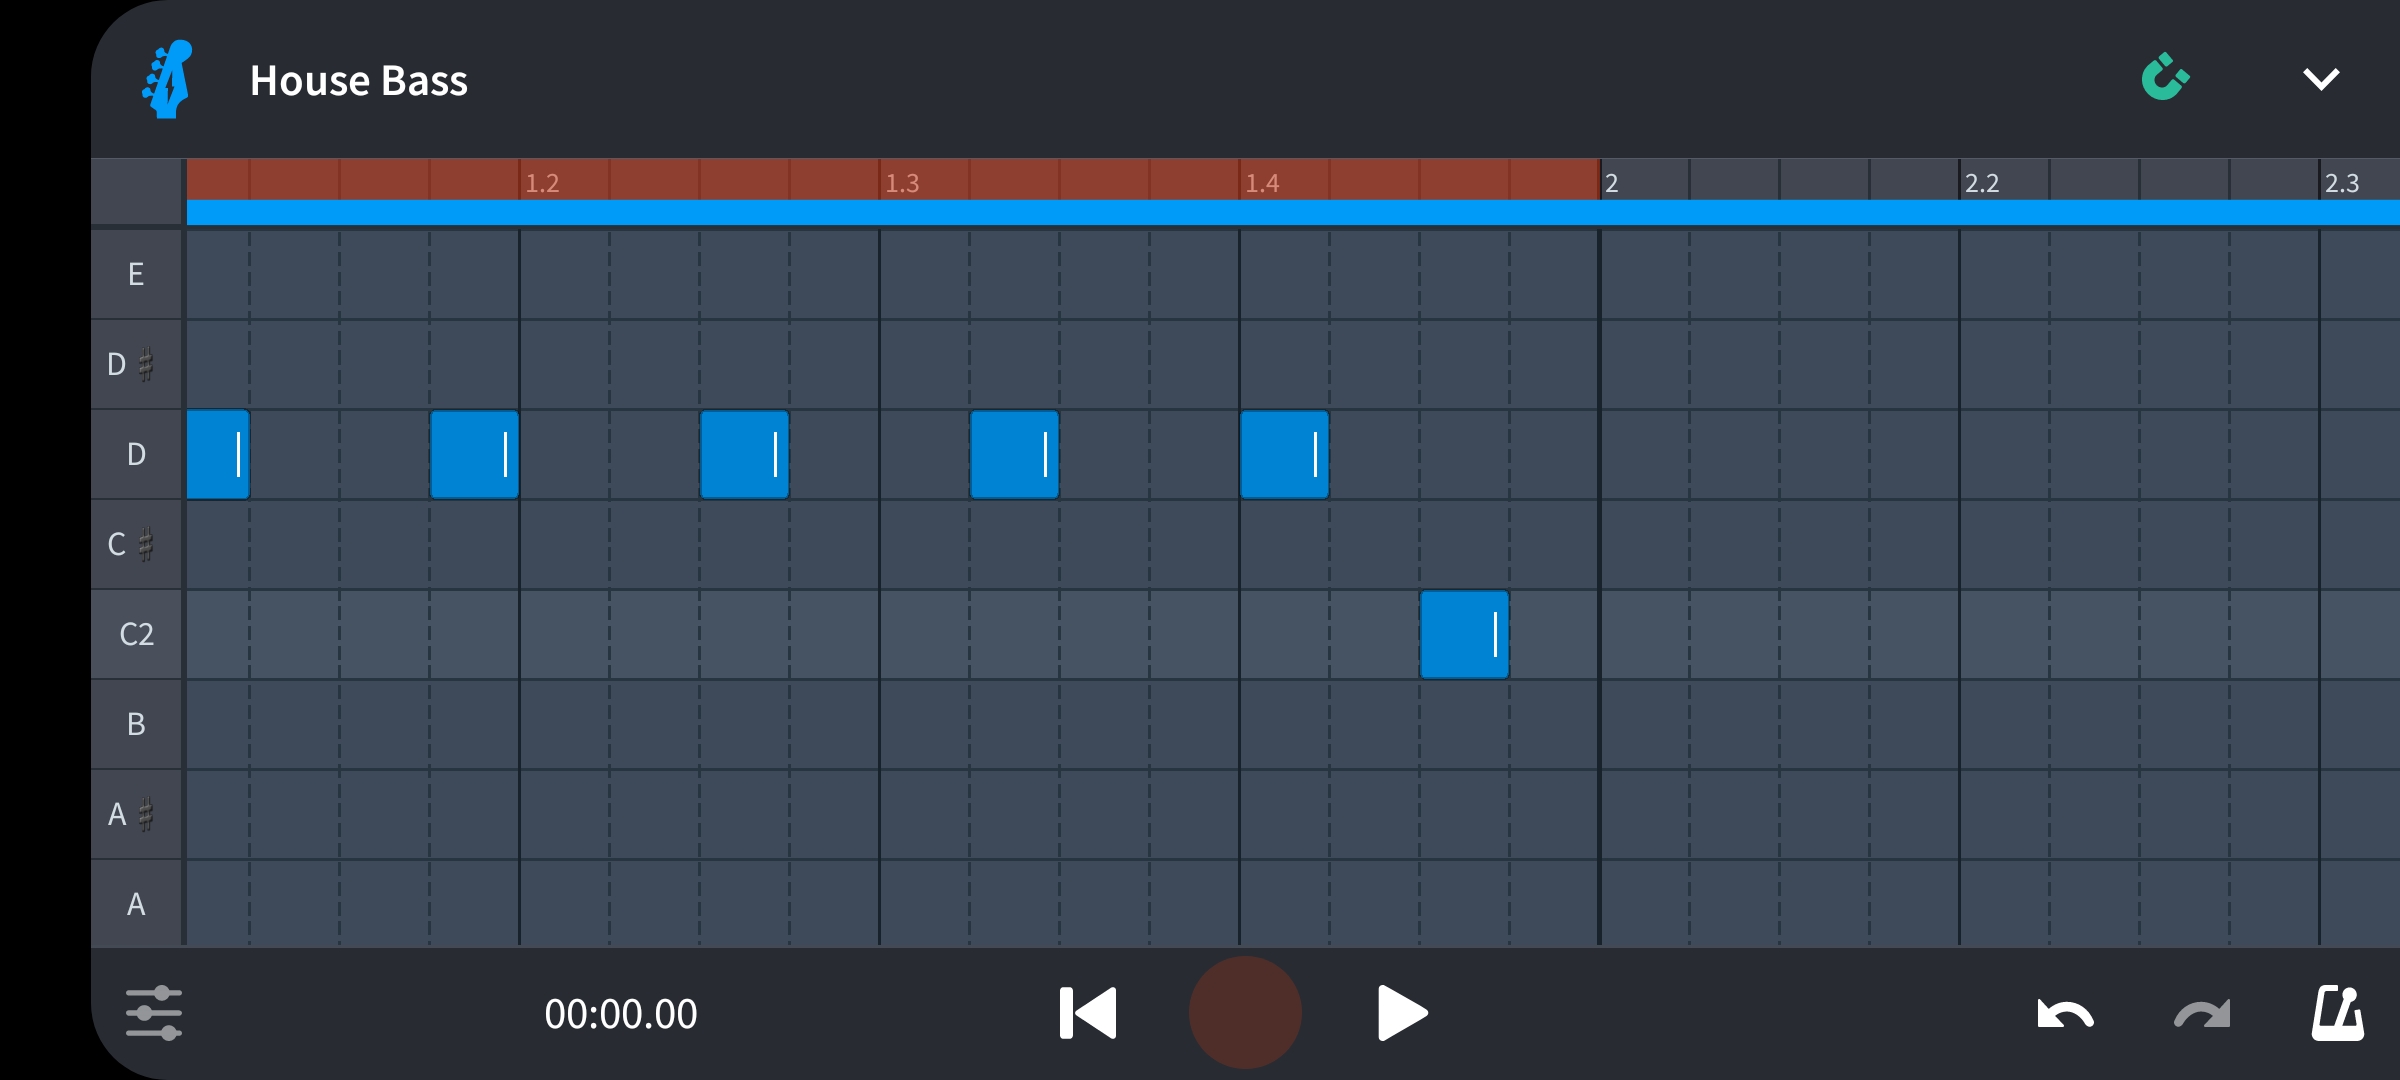
BandLab Image 2.0
Adding Chords
Now it’s time to add chords.
Select Keyboard instrument from the same old top strip menu again.
Download the Electric Piano and click it again to go to the MIDI programming screen.
Click the pen icon on the bottom right corner to program the notes.
- Look up for how to add instruments if you are lost. Refer previous steps for repeating process.
Copy the notes in the image below or program the chords you prefer.
These are the only notes though not fully visible in the image-
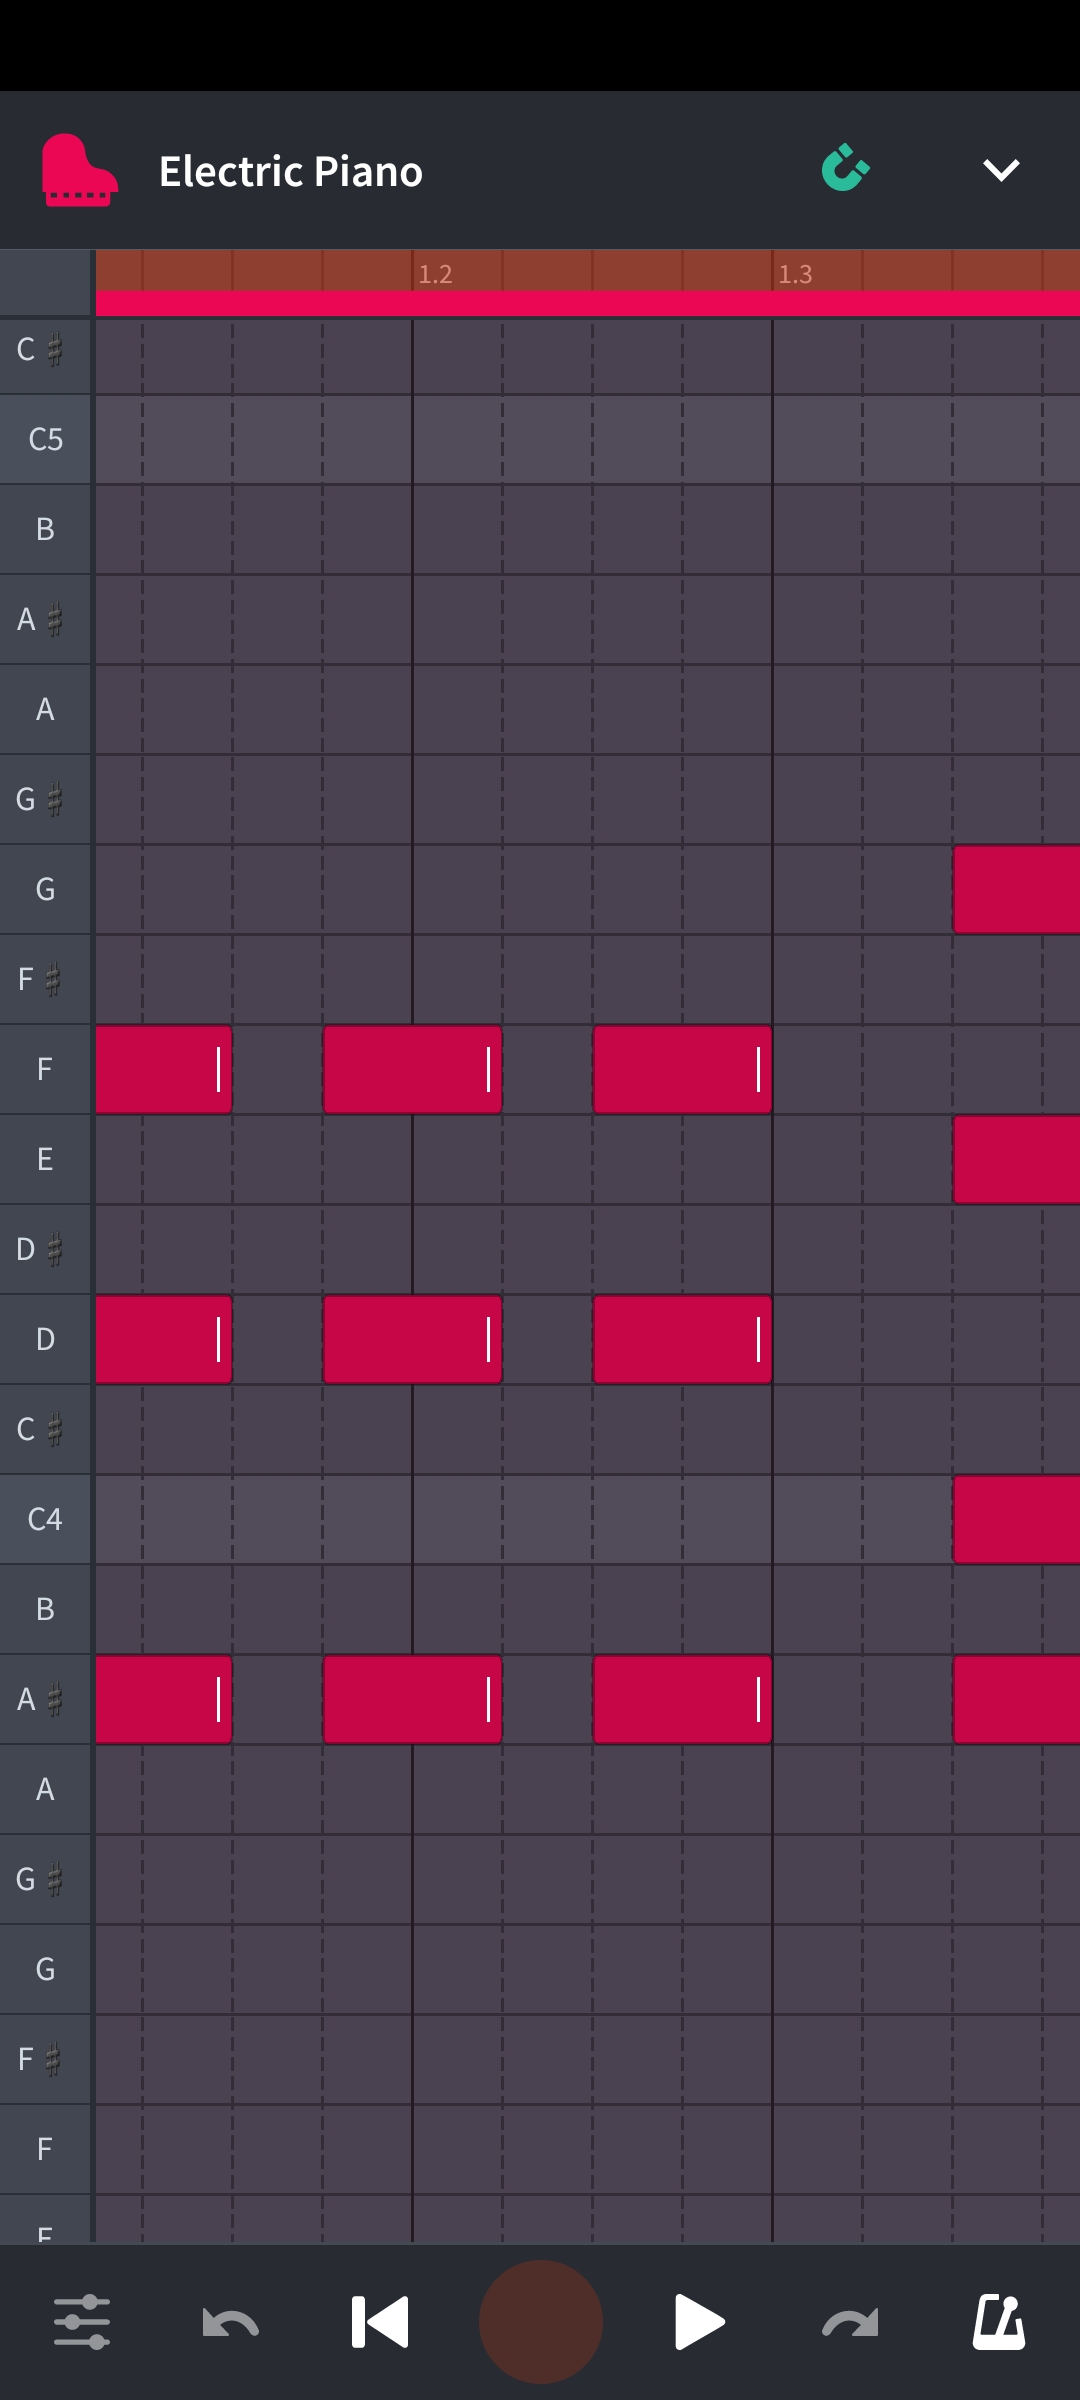
BandLab Image 2.1
Adding Counter Melody
For adding interest to our melodic part, we need counter melody.
A counter melody is second melody that plays with the main melody for its accompaniment.
Here the main melody for our house track are the chords.
We are selecting the String Orchestra instrument for the counter melody.
Now jump into the MIDI Programming and copy these notes or program your own.
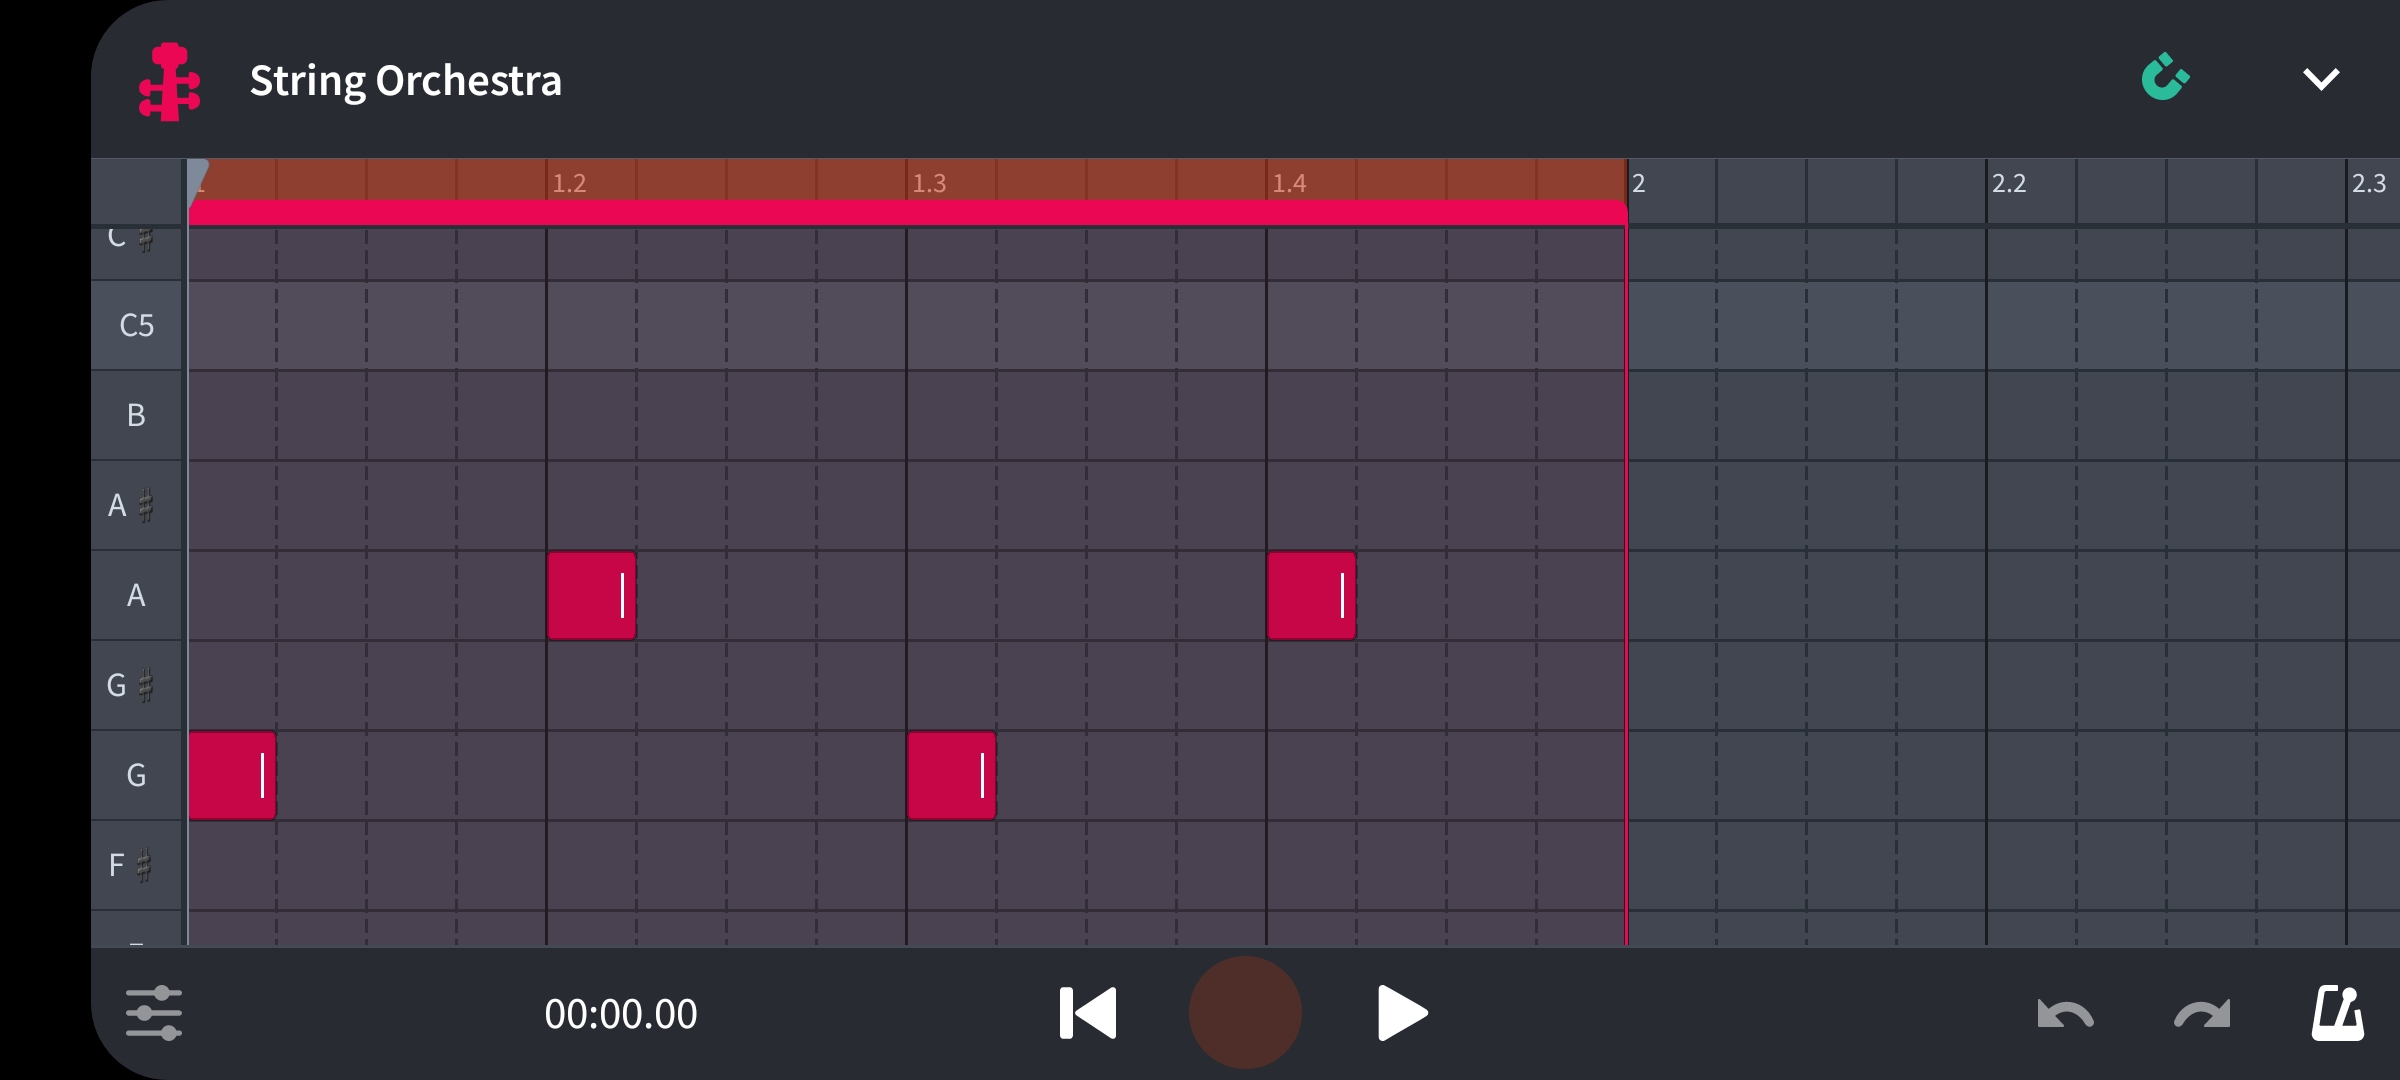
BandLab Image 2.2
Arranging the Track
Our layers are done and we are ready to make a simple track out of it.
When you come back to the screen where you add layers/instruments, you can turn the clips into the whole song.
To do this, simply tap the clip you want to make a loop of and select the turn into loop icon as below, which turns the clip into a extendable loop.
BandLab Image 2.3
You can stretch this clip for as long as you want.
At the bottom, you will see the loop section which has 4, 8, 16 in the option.
Select 16 for every layer by repeating the process for every layer individually.
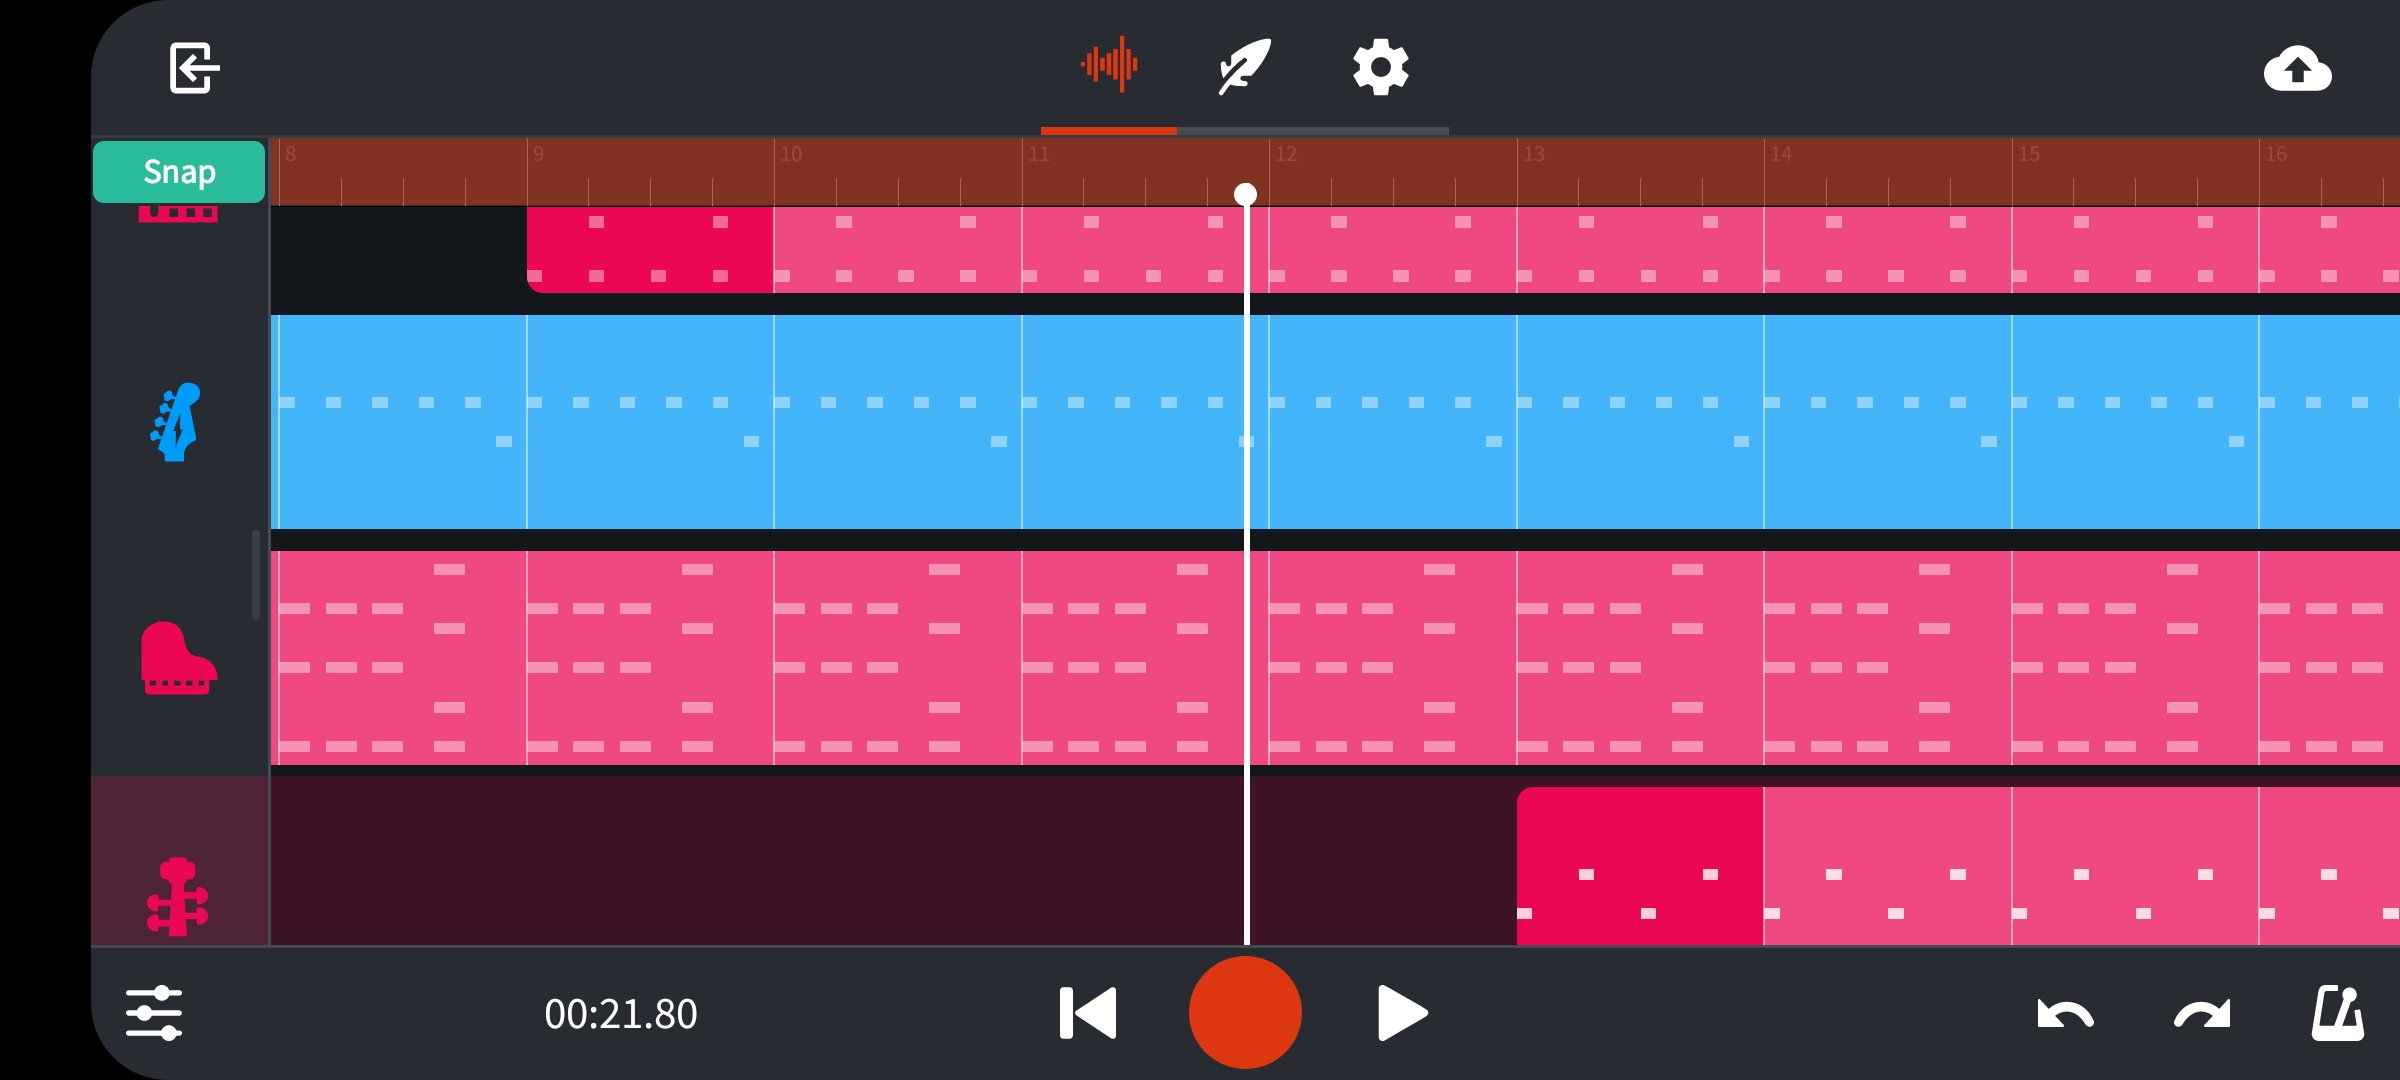
Then your clips will look like this-
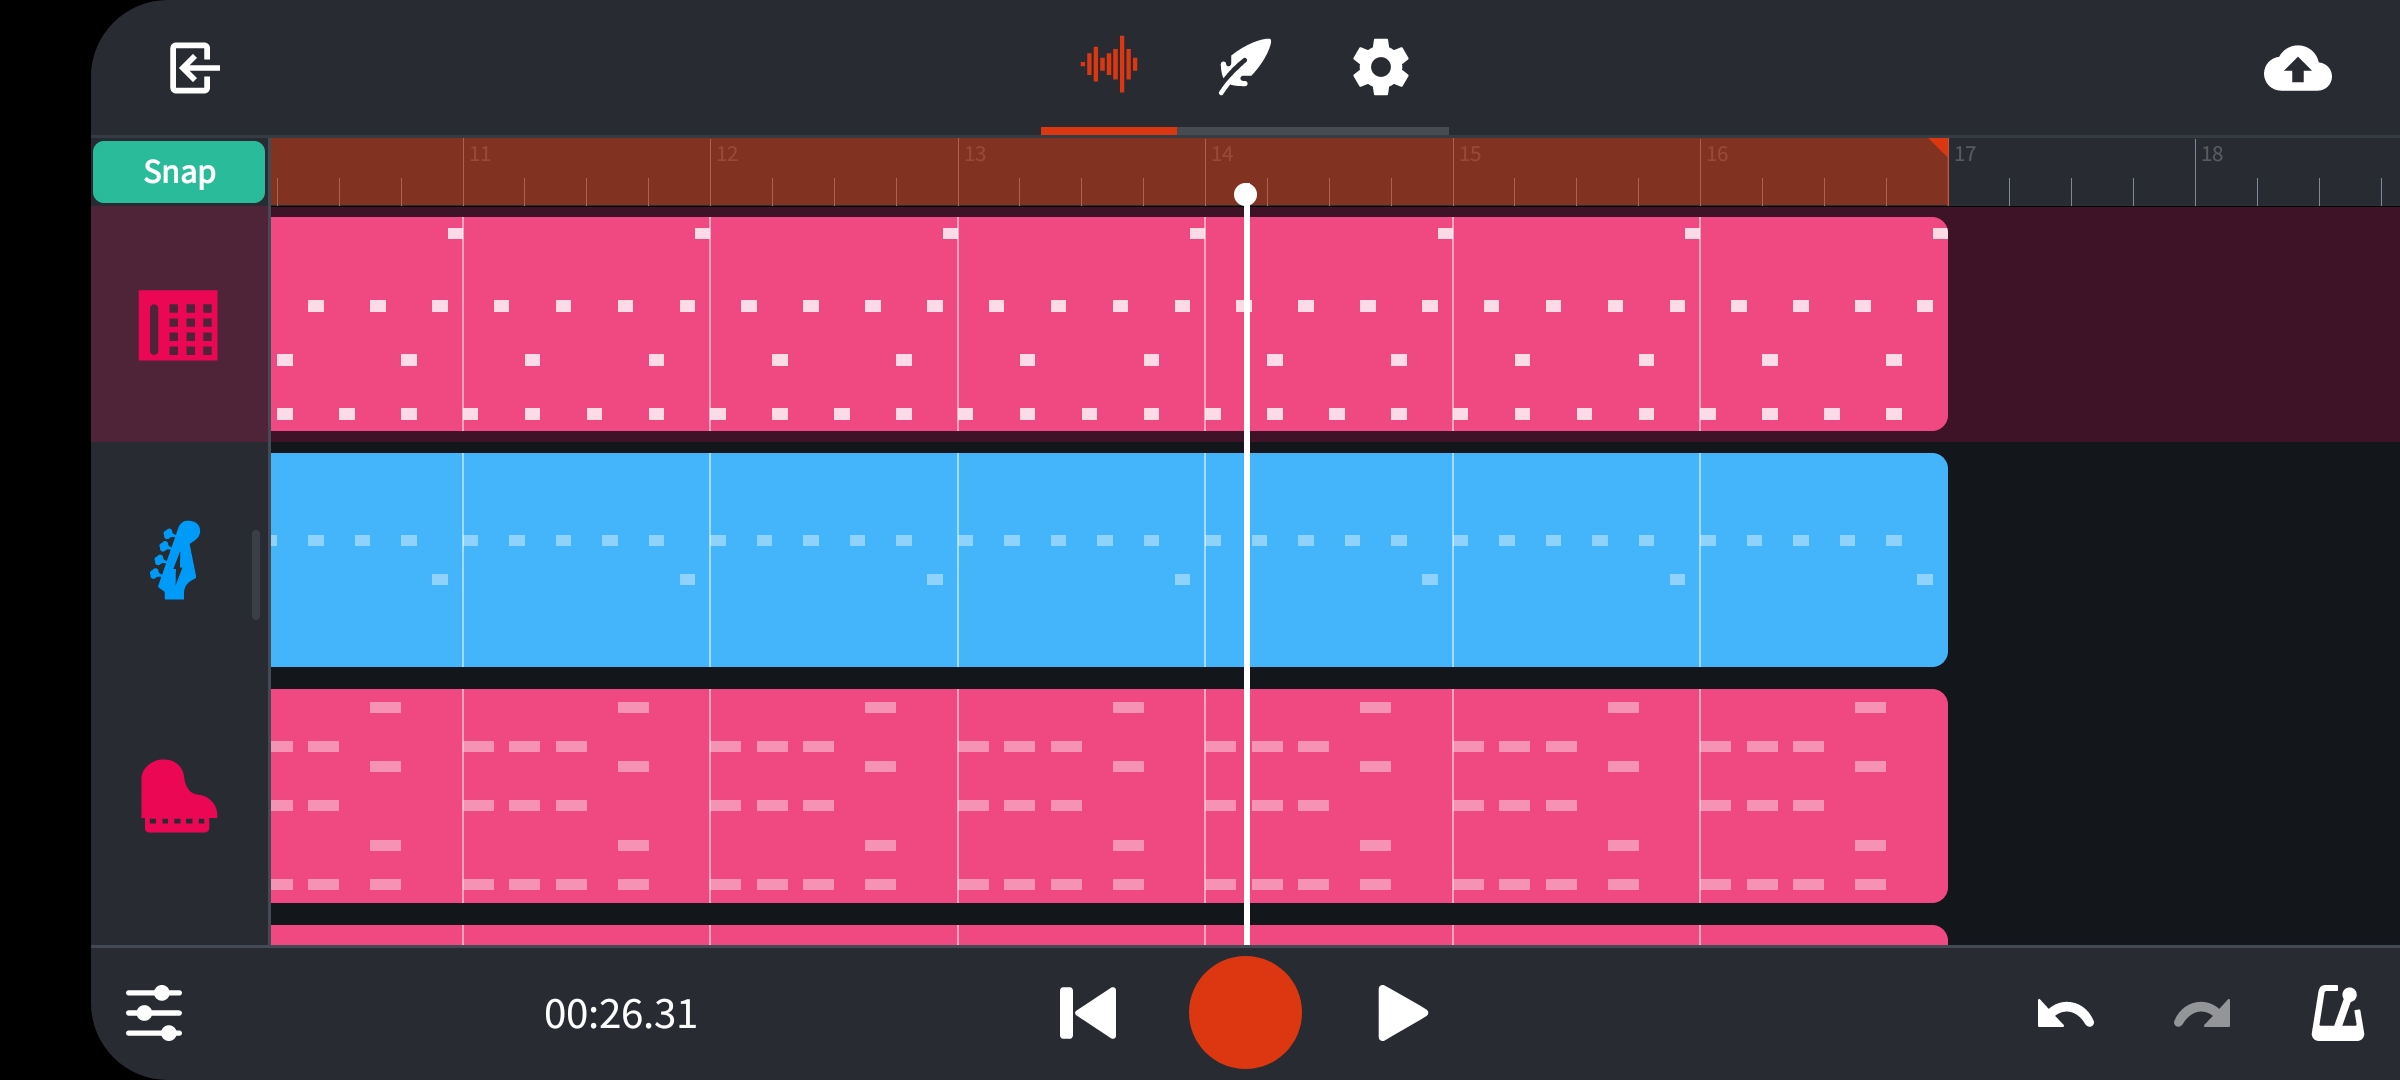
BandLab Image 2.4
- These clips are extended till bar 16th. The bars can be seen right above the top most clip like a measuring scale.
A musical bar is a group of evenly spaced beats made for structuring the music into sections.
1 bar has four beats.
A typical verse is of 8 bars.
As you can see above the top clip, is a dark red strip (aligned horizontally at right with the Snap button in the image above) which is for playback looping.
- If its grayed out, tap on it to activate it so that the track keeps on looping within its boundary. Stretch it all the way up to 16 bars till the clips are available.
Now for arrangement we will start the song with one layer and will gradually build it just like any song builds up with few instruments at the beginning.
A musical arrangement in simple term is to build up the song with different instruments in a gradual way so that it feels more natural to listen to with sections like the intro, verse, chorus, bridge, outro etc. It involves decisions about which parts will have what instruments and how many and for how long.
After all your clips are stretched out, first bring the vertical play head to the start of the bar 5.
Tap the Bass Clip and split the loop into two at that point.
The split option is the third from the left as shown here-
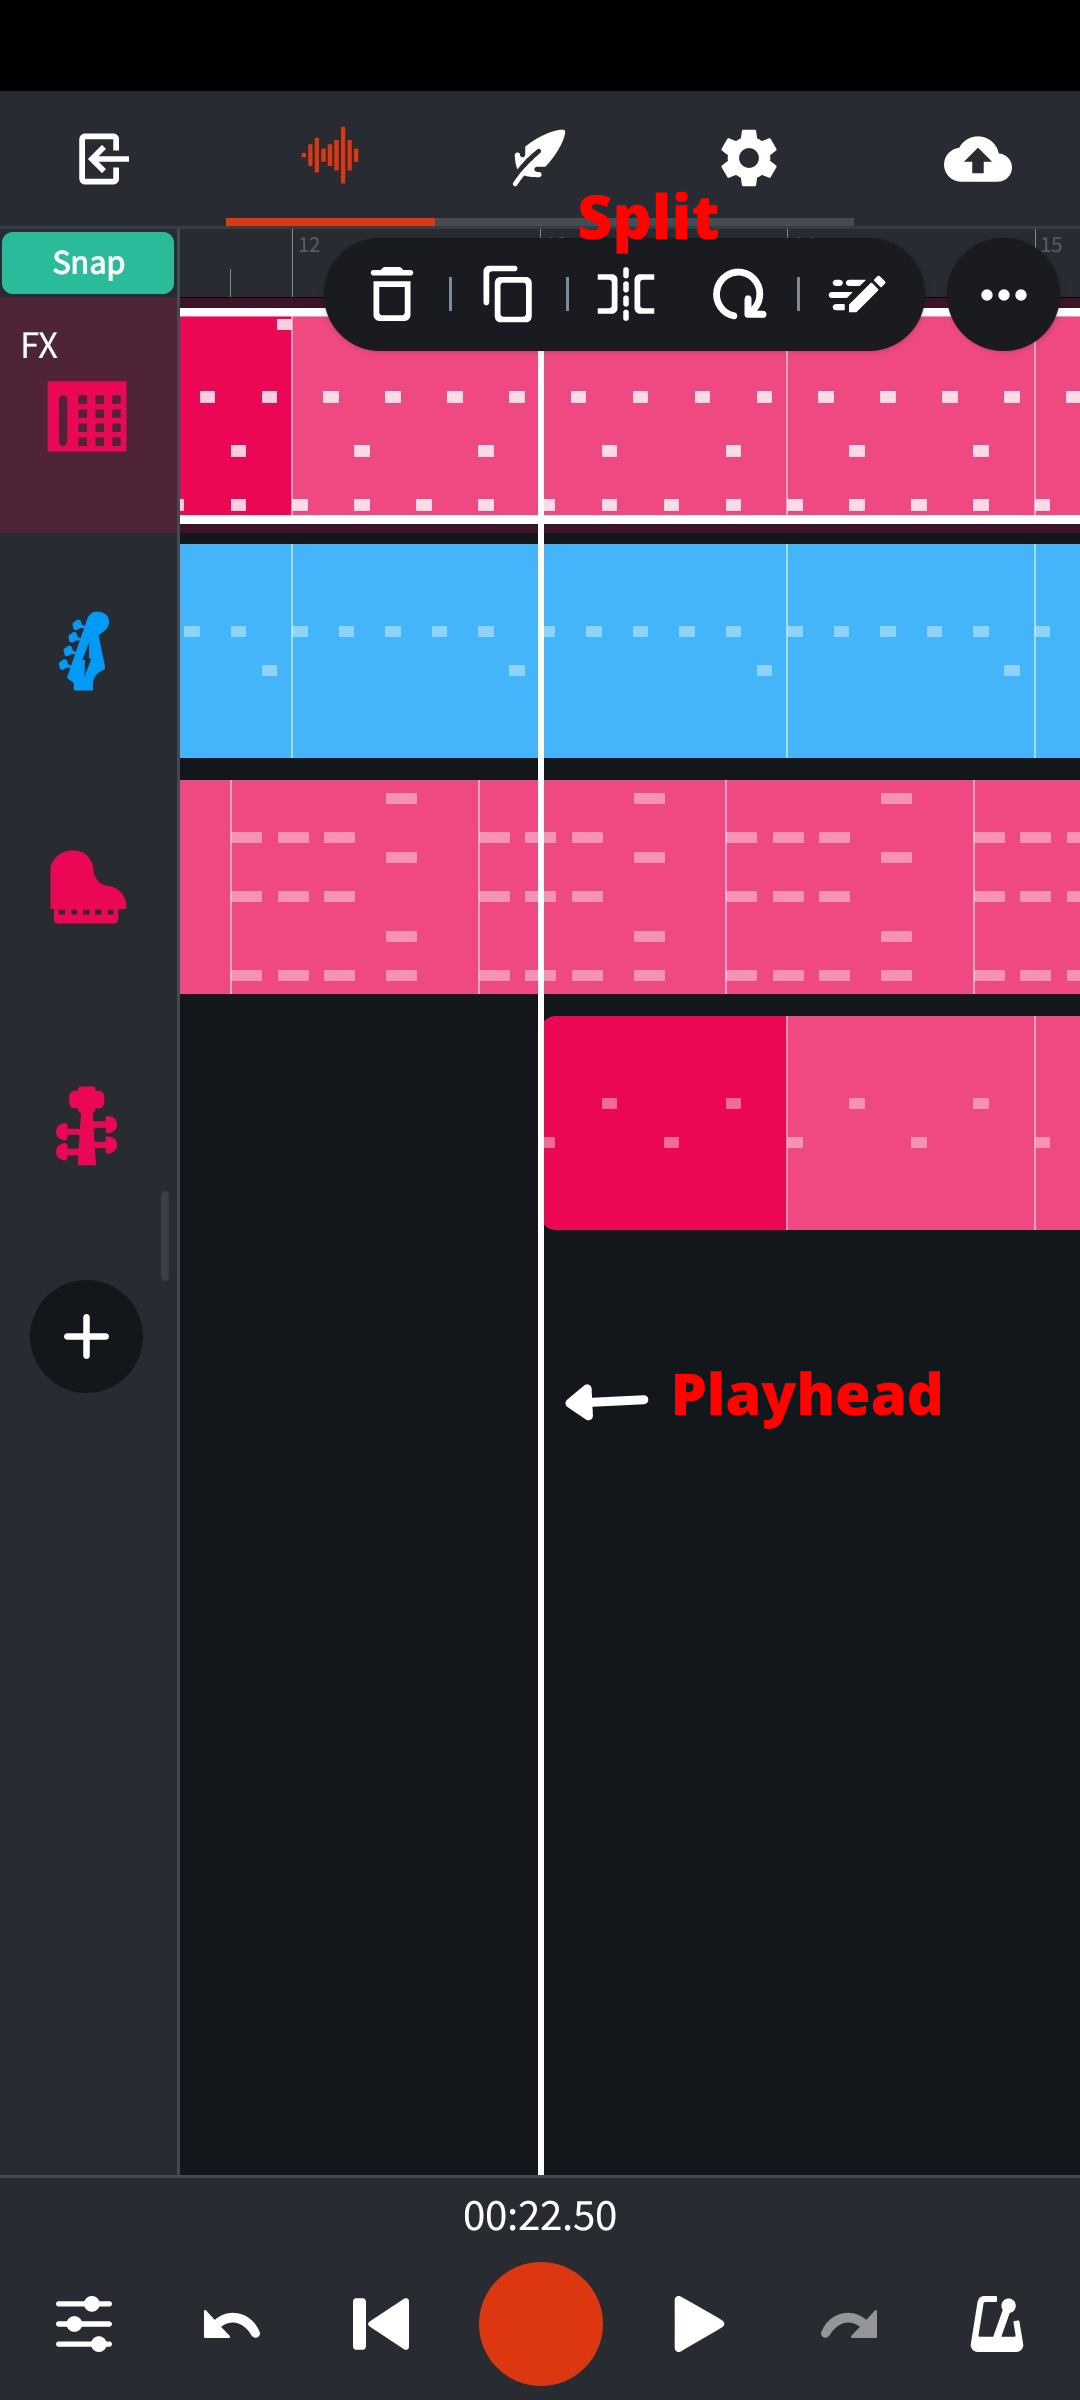
BandLab Image 2.5
Now delete the first 4 bars of the Bass loop and leave the rest of it.
Now come to the start of the bar 9 and split the drum loop at that point.
Delete the clip part before the clip 9 and leave the rest of it.
Now do the same for the String Orchestra layer.
Split it at bar 13th and delete its part before 13th bar that and leave the rest of it.
Now your arrangement should look like this –
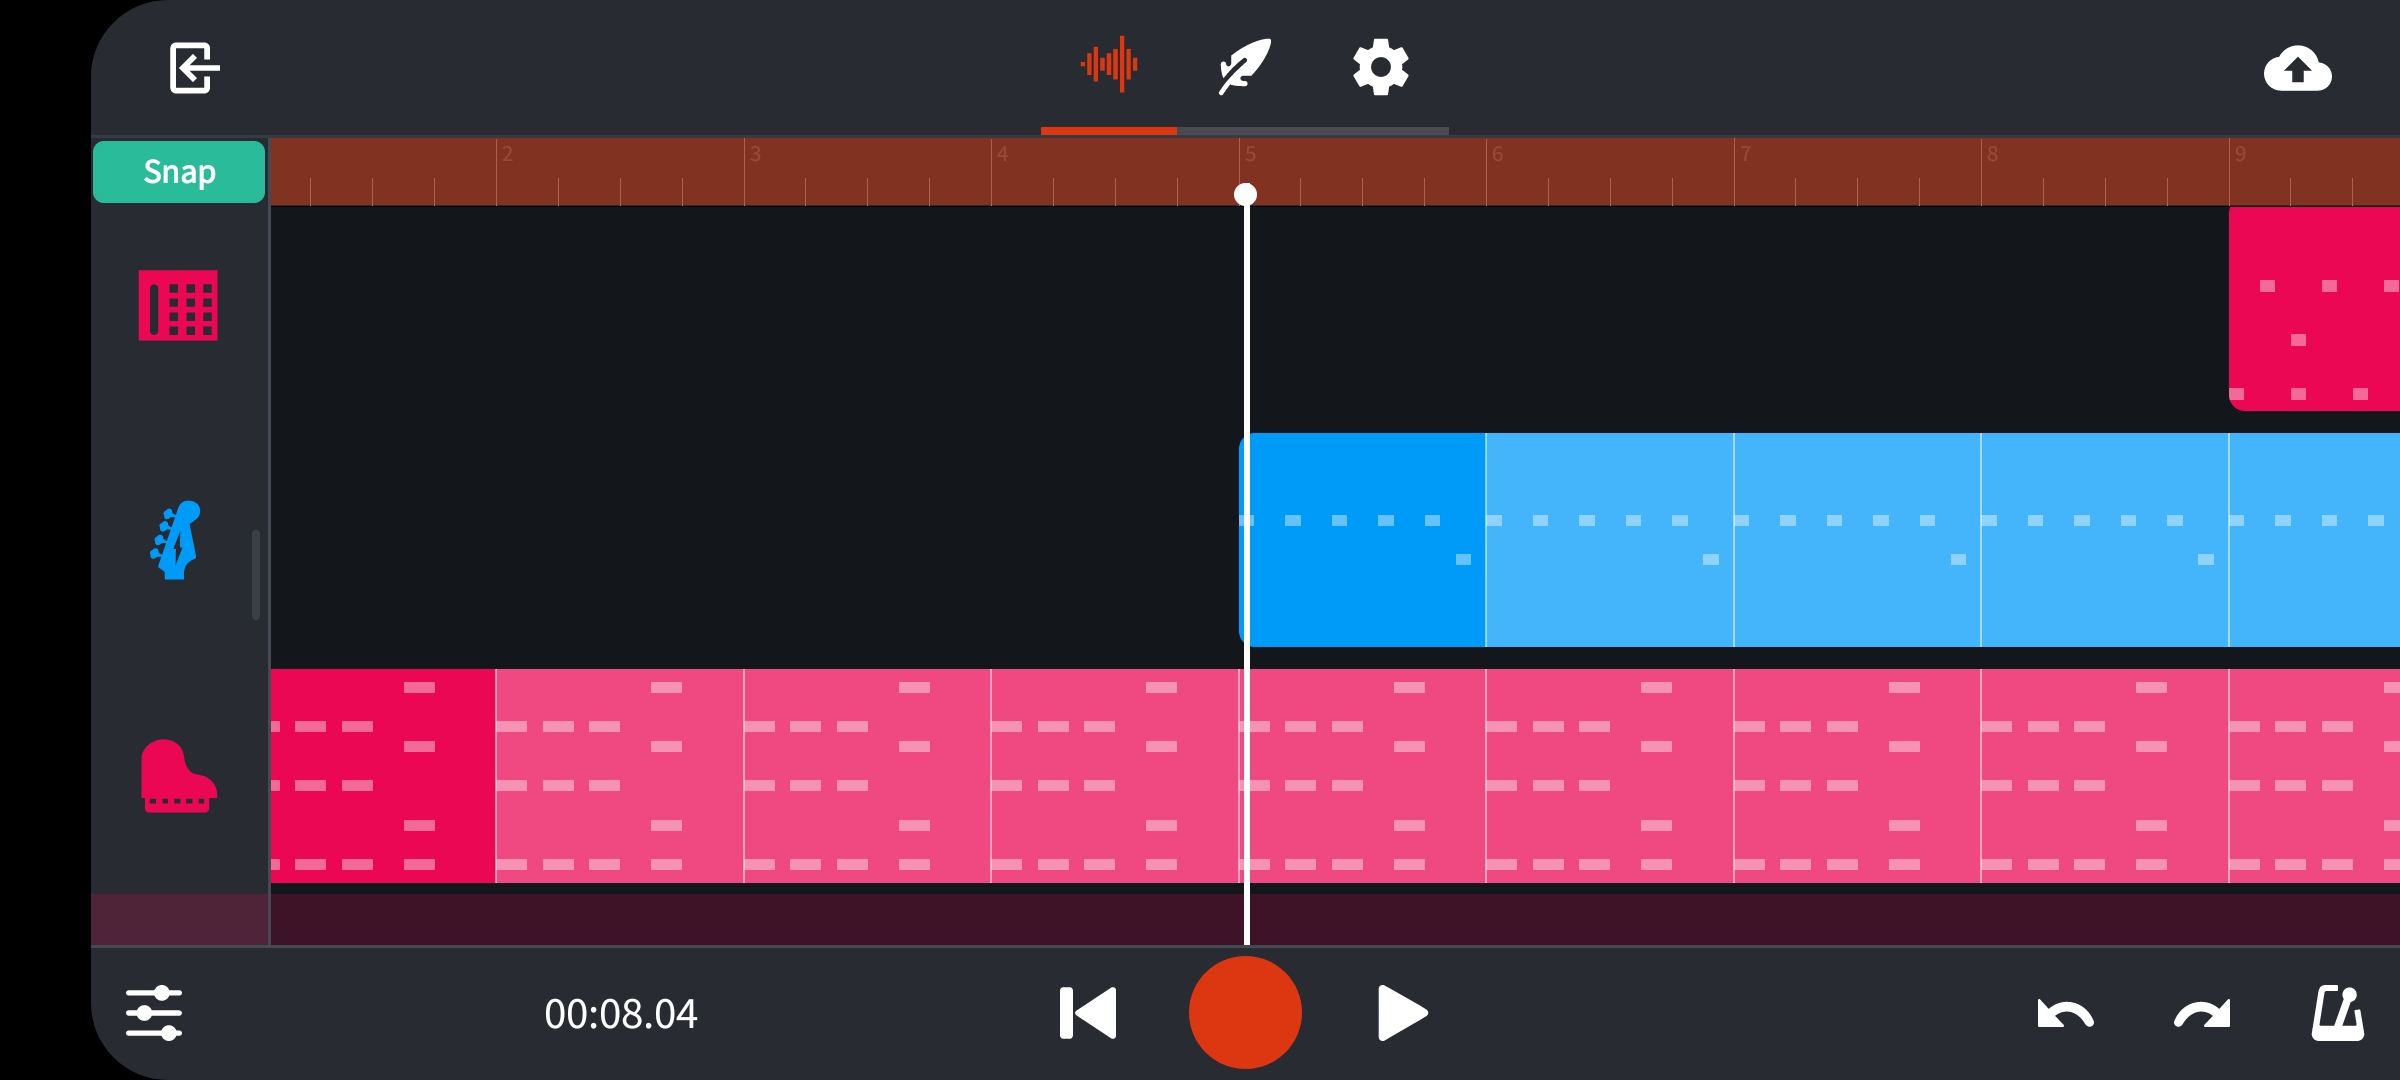
BandLab Image 2.6
BandLab Image 2.7
So now we are done with the arrangement of a basic 16 bars track.
Adjusting the Track Levels
On the screen where you add instruments and where you did the track arrangement, look at the bottom left icon of three horizontal lines with slider like dots on them.
Tap it and the levels will appear from the left if you want to adjust.
The three dots will give you more options you can check.
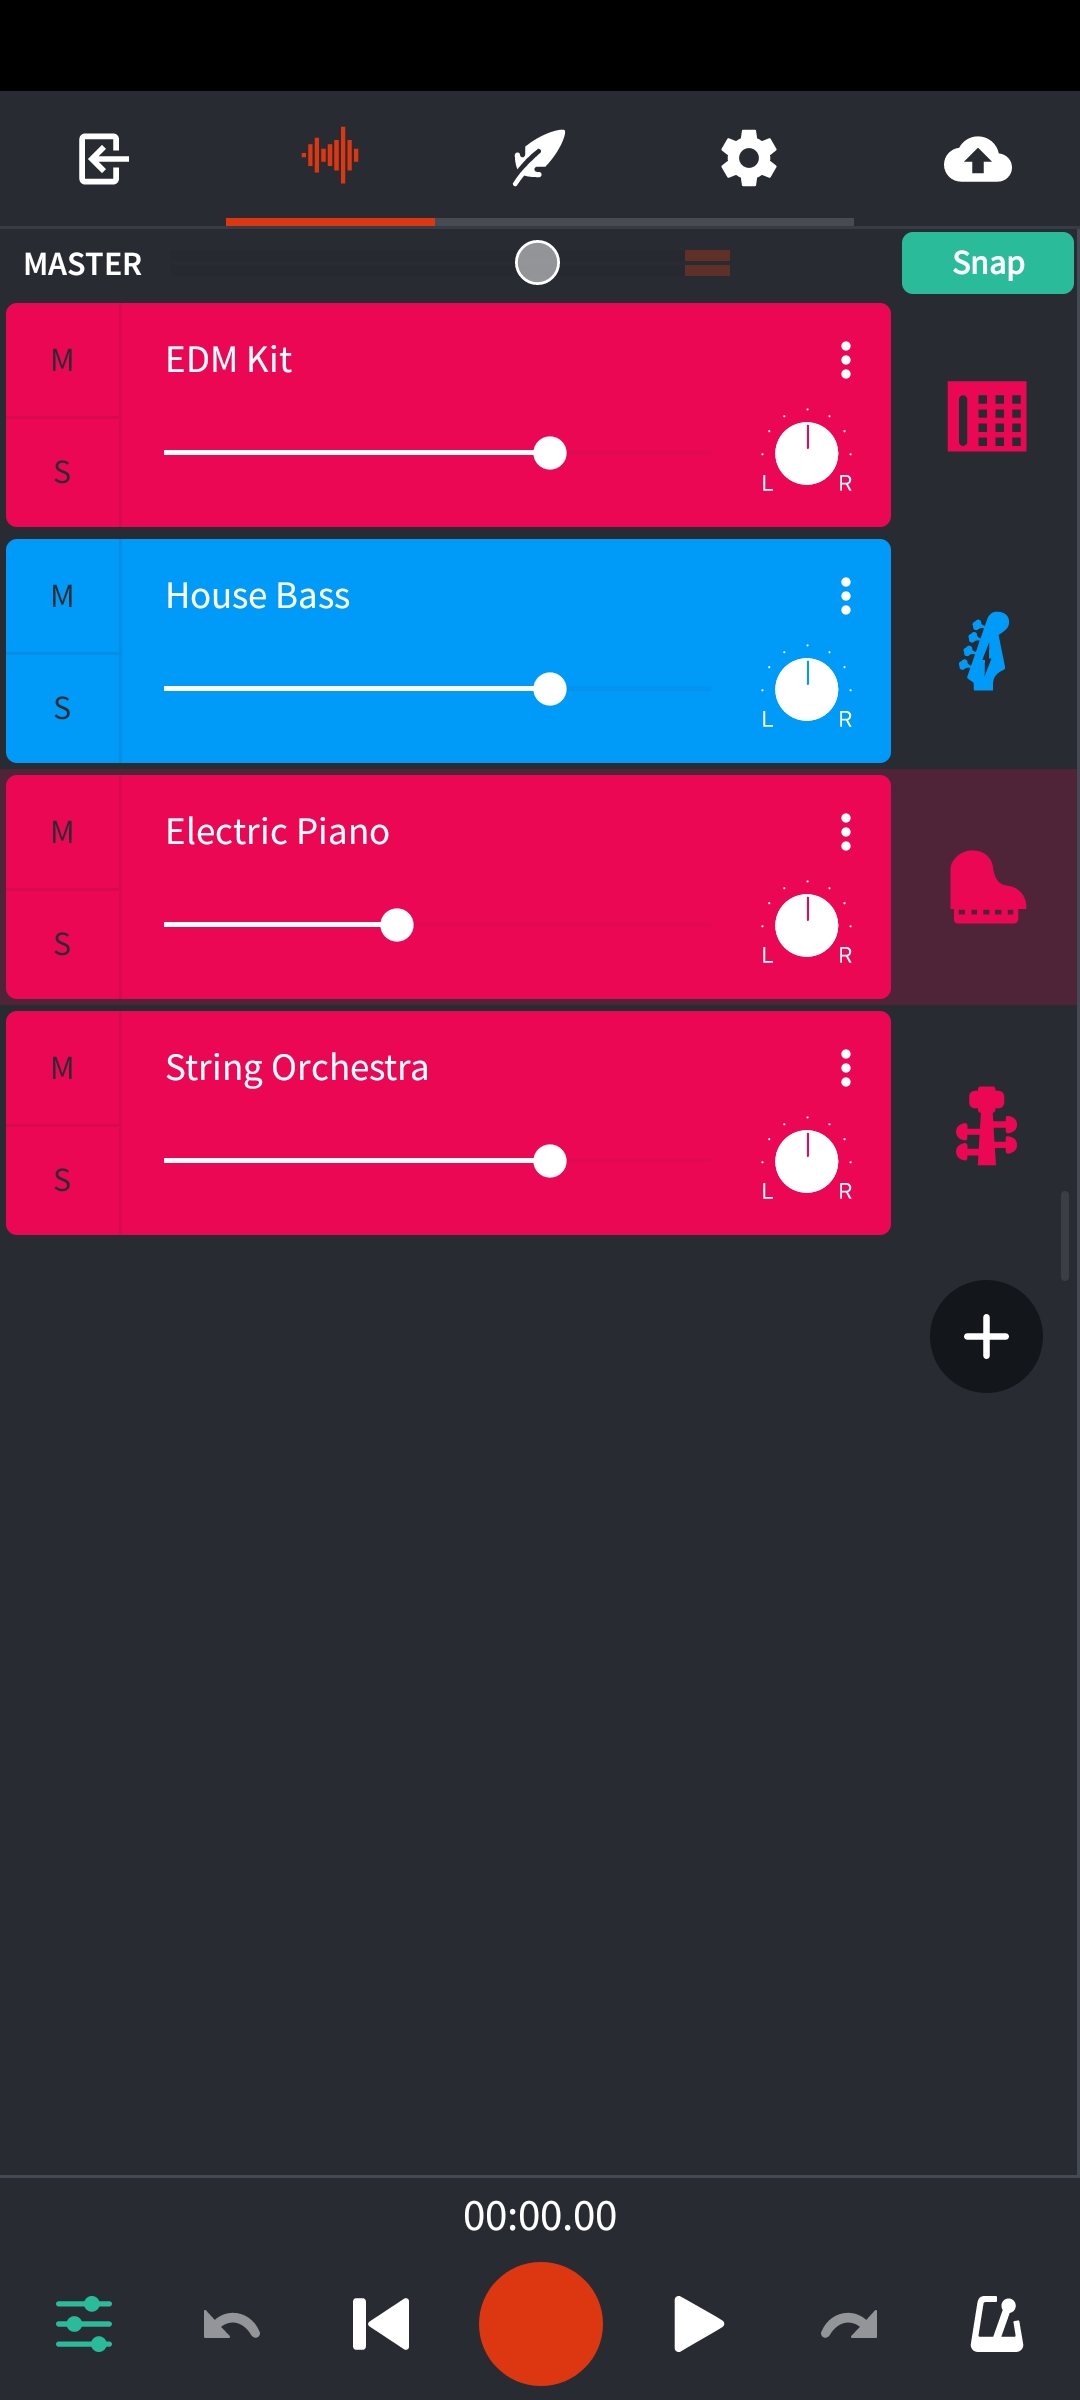
BandLab Image 2.8
Saving the Project
To save a project, click on the top right corner on the Cloud icon (see image 1.4) and tap save.
Give the name.
Tap Additional Settings and choose mastering and select any option of the four which are CD Quality, Bass Boost, Enhance Clarity and Original.
Now tap the top right ✔ icon. Hit Save.
Your Project will look like this-
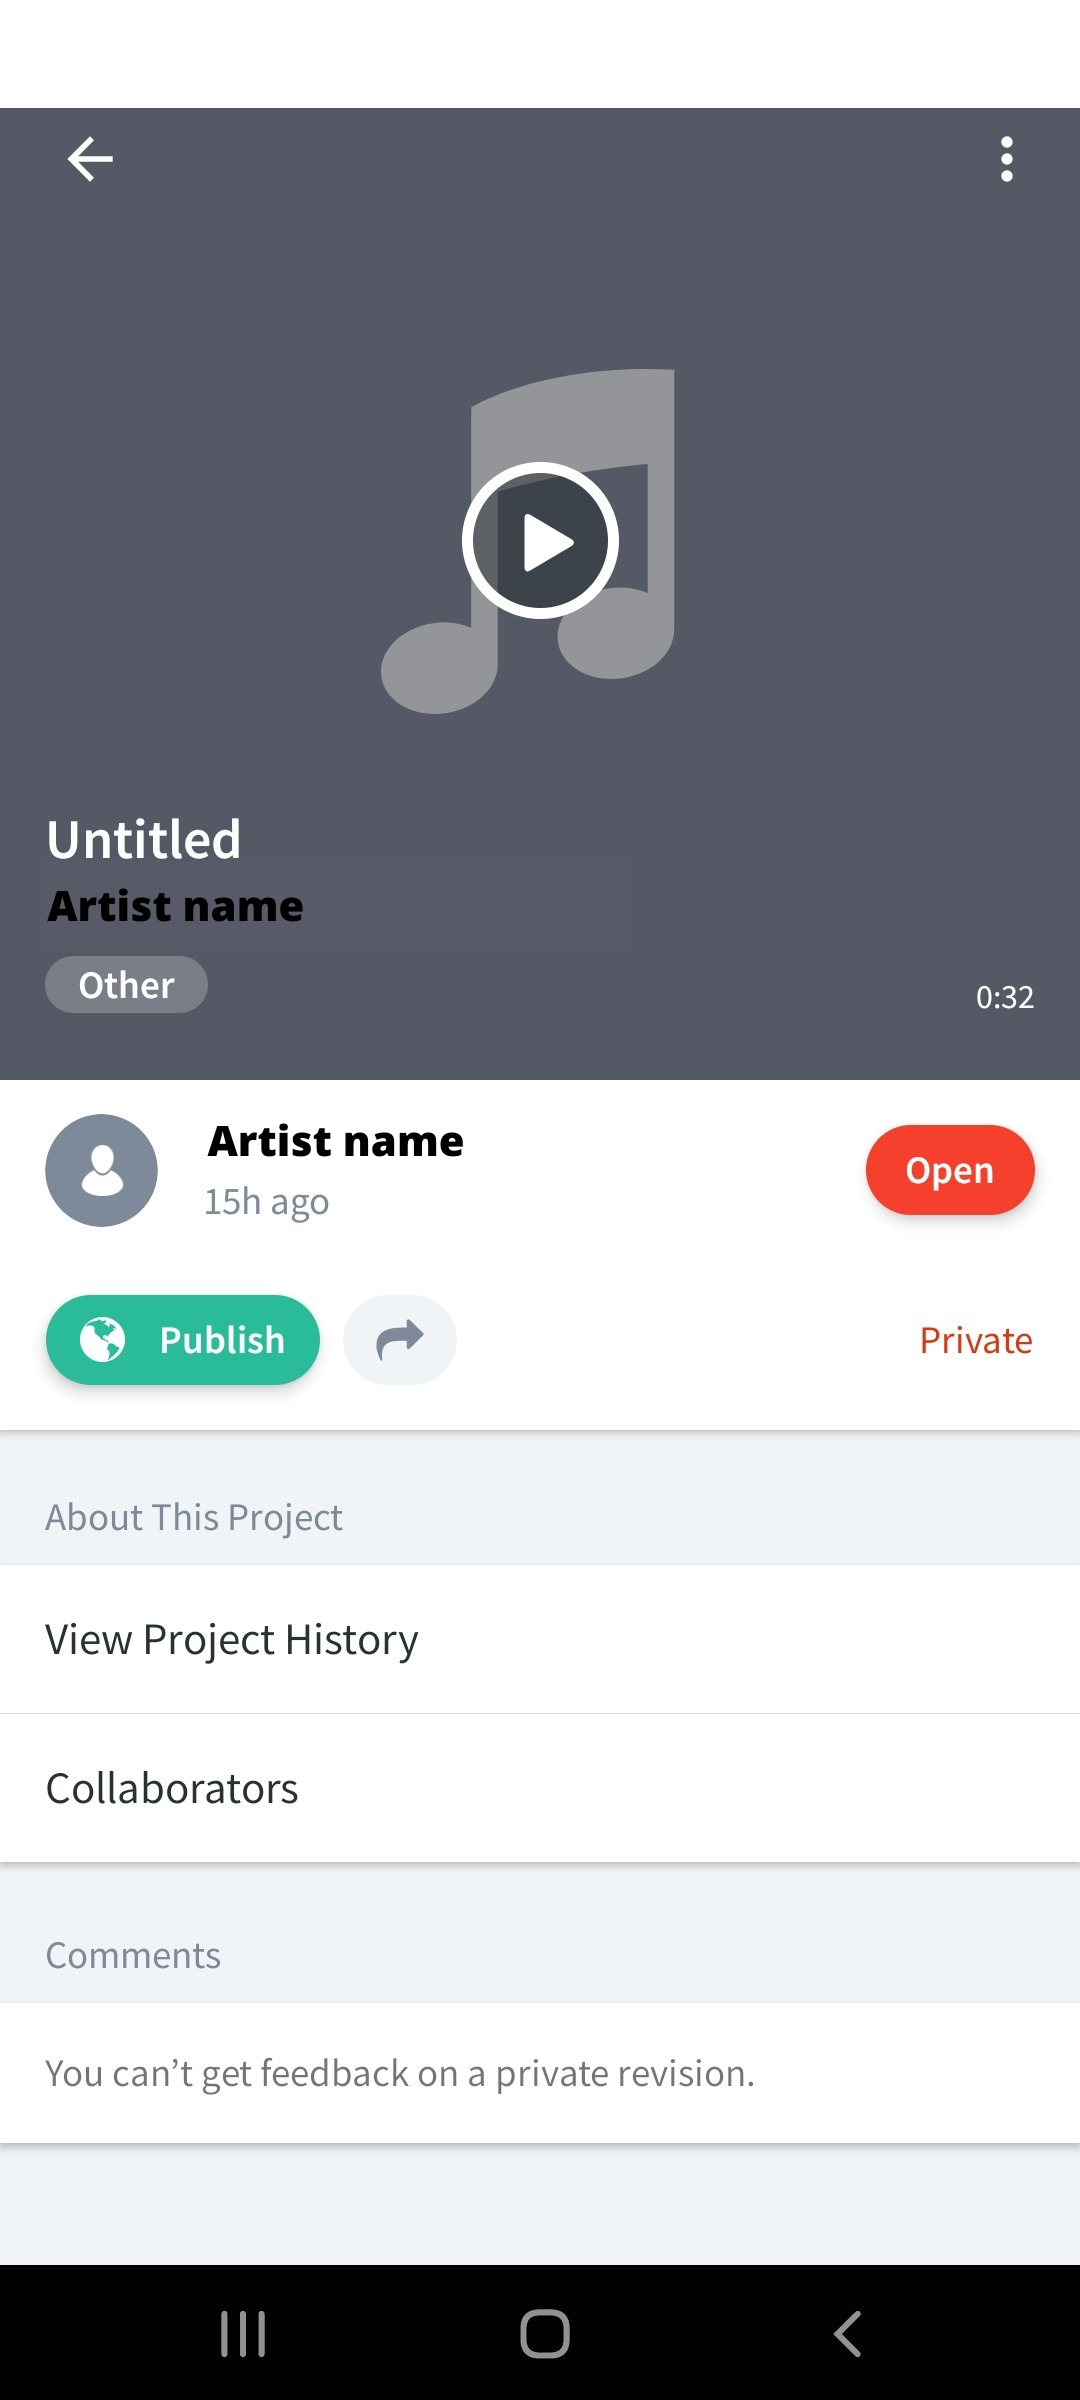
BandLab Image 2.9
For Downloading your song, open BandLab and tap the bottom right folder icon with a music icon in it.
Select My Projects > (Your Project Name) > Share Icon > Download > Download as Audio.
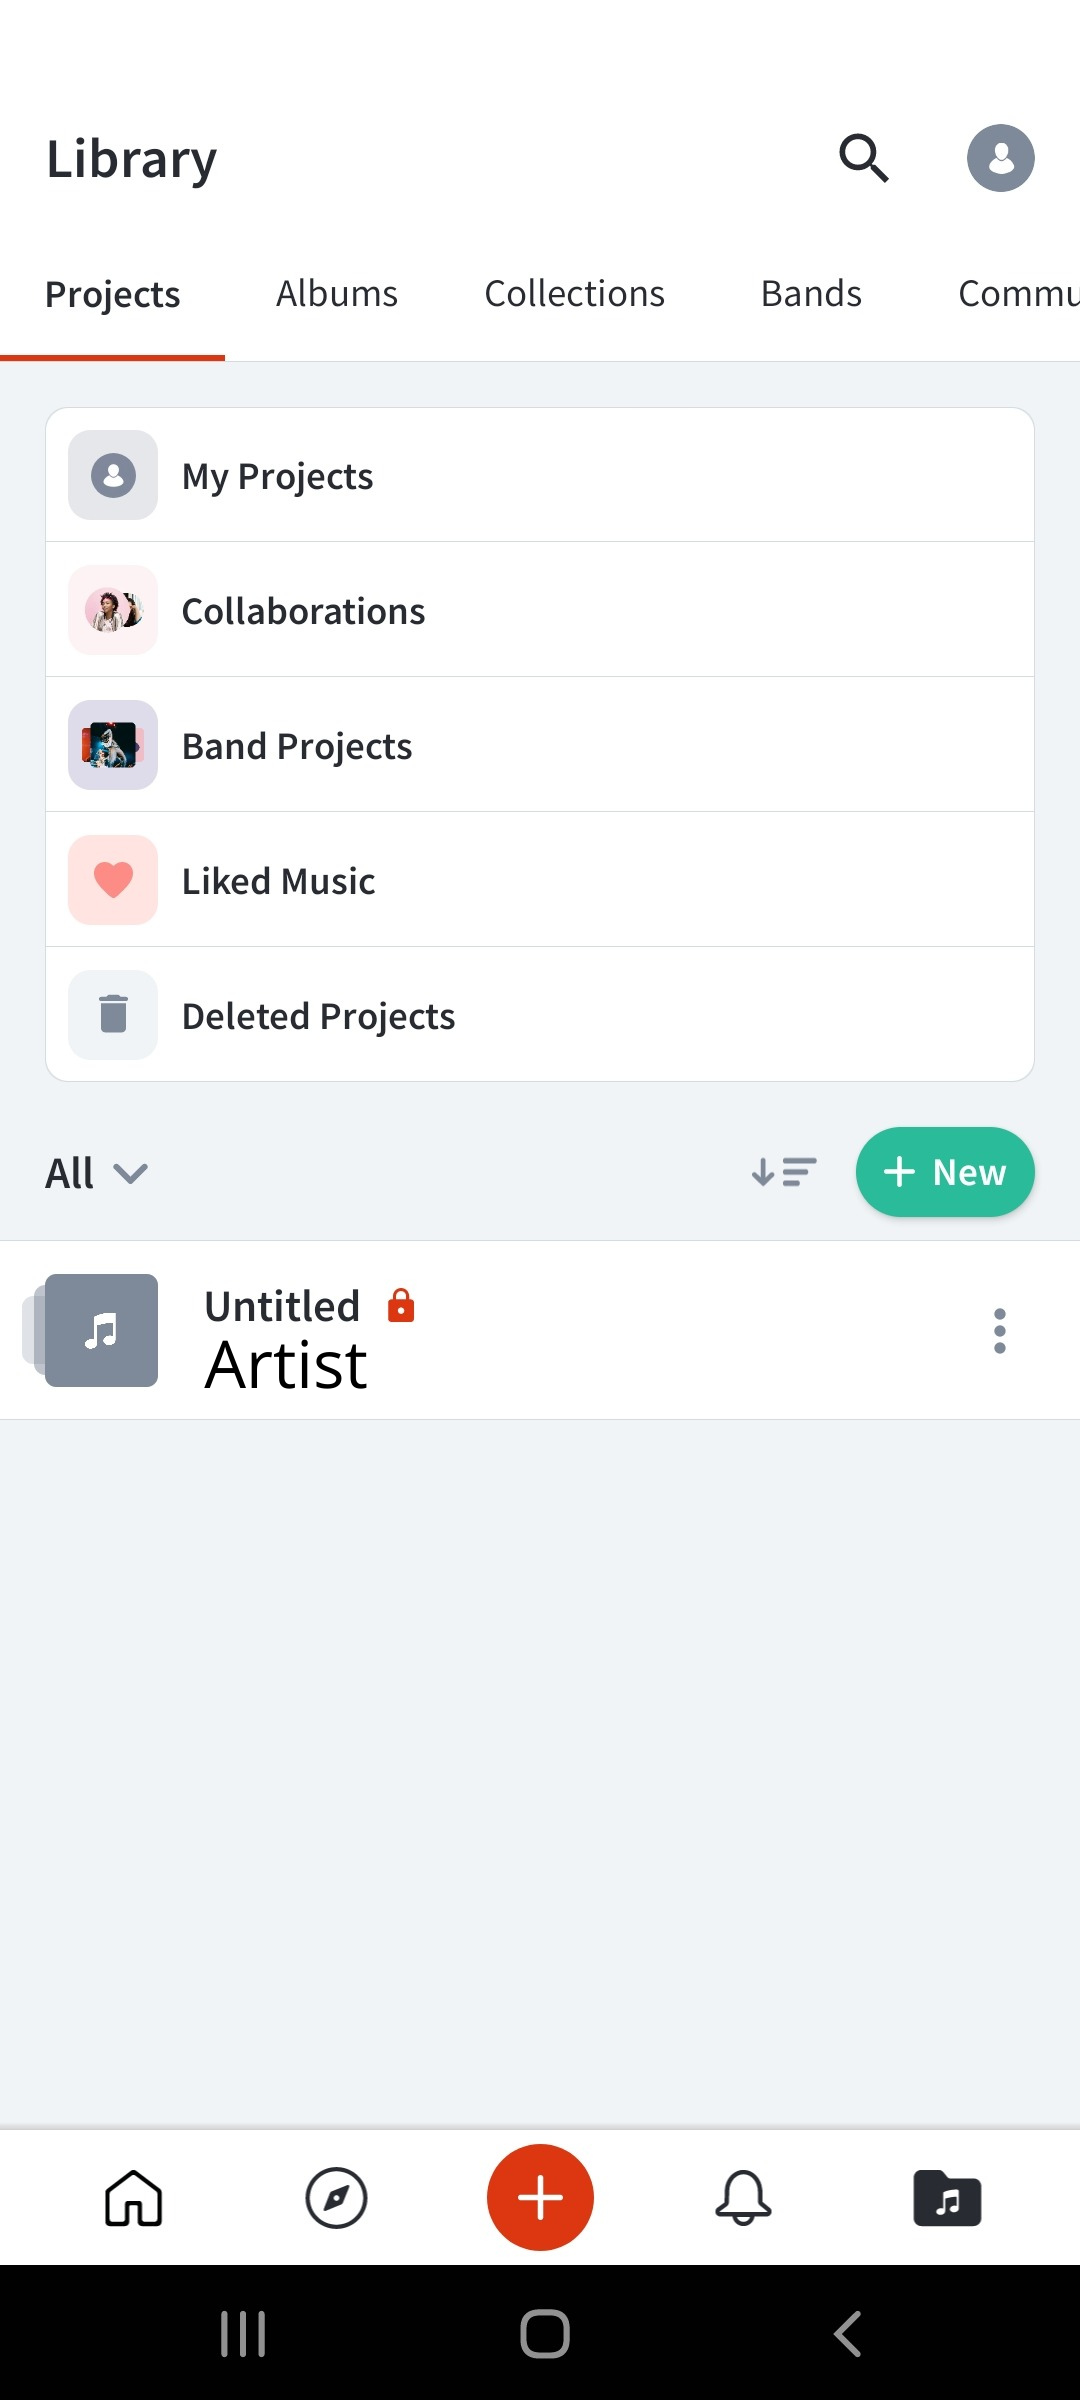
BandLab Image 3.0|Projects’ Library Screen
Instead of Share you can also tap Open and then Mix Editor (image 2.9) if you want to make changes to the track.
So that’s all about producing music on your smartphone.
Share the article on your socials to help others make music on their smartphones.