Contents
Since the day I started as a music producer, I always admired how the professional songs are made, how well they are structured and composed and how well the development grabs the listener.
After giving a lot of time and effort, I learned all the tricks of the trade that goes into this art form.
So,
How to Make Your Music Sound Professional?
Here is the summary to make your music or song sound professional:
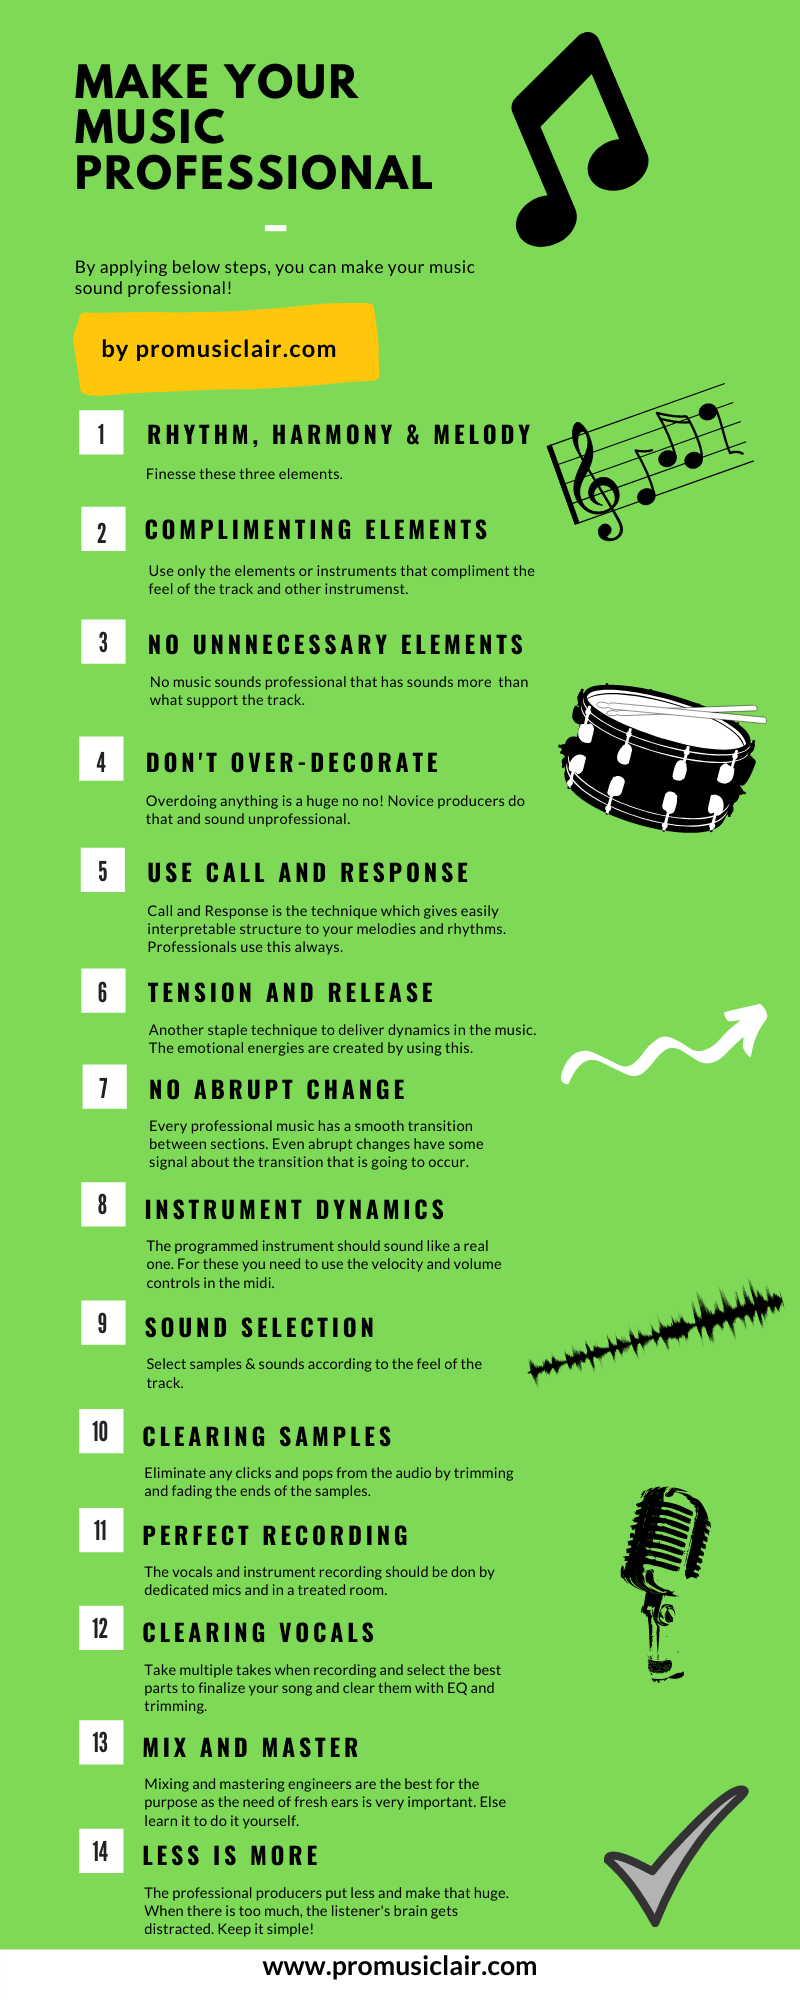
- Finesse the 3 pillars of your song : rhythm, harmony and melody
- Everything should compliment each other. This includes rhythm, harmony, bass and the atmosphere.
- Don’t put unnecessary elements
- Too much decoration is unprofessional. Put only what drives the vibe.
- Use Call and Response technique for melody and rhythm phrases to make the song memorable
- Use Tension and release technique for the emotions
- No abrupt change
- Make the dynamics of the instrument played or programmed feel real and natural
- Perfectly do the Sound selection
- Clearing the samples
- Perfectly record your vocals and instruments
- Clearing vocal takes
- Perfect Mixing and Mastering
- Less is more
Its not that hard to make your song sound professional. Its only a matter of some concrete practices to learn producing. If you follow these things, no one can find out that a novice/intermediate producer has made this music.
Also I have a detailed article on How To Mix A Song – 17 Steps That Engineers Do , 41 mixing tips from Grammy winning engineers and 31 practical tips for mastering.
So actually, How does one make his music or song sound professional?
Lets see the steps in detail..
Before we start, let me introduce you to our –
Make sure to check it out.
1. Professional Music has Perfectly Working Rhythm, Harmony and Melody
If you are new to music or an intermediate one, chances are that you might be very much aspiring to make your music sound as best as possible. Your natural instinct must be to put in all that you have got.
However, the better approach is to understand the song and what emotions its going to develop in the listeners’ mind.
After you nail this down, it will be easier for you to decide what needs to go into your music.
When it comes to production of the track, you can follow some simple yet powerful guidelines.
There are a lot of professional tracks and its rhythm may be similar to what you want to make. Draw inspiration from them. Study the track’s drums.
Ask yourself..
Are there too many elements used so that the rhythm results more driving? What about the low end, what about the hats, cymbals, rides etc.?
What parts are they playing. Are they playing at the same time or making a question and answer pattern?
What is it about the pattern that you can directly put in your music or else what can be better if manipulated? Ask these questions to get the answer that goes well with you track.
Tip:
You can directly copy the “patterns” of the drums of the songs you love, with similar sounds so to give it your unique touch. Even a small change can work dramatically!
The Harmony is yet another element of your music. It inculcates the required emotions in the listener. As far as the goal is to make your music sound professional, better copy the famous chord progressions!
There is no copyright law for the chord progressions whatsoever!
Pick the best chord progressions from a number of songs which are out there. Better to copy from the one you love.
There are a number of ways to alter them so that the result won’t sound copied!
You can change the instrument. You can change the playing style. You can layer the sounds. You can change the bass notes etc..
So, again, copy what works! There are many ways to turn a copy into your own!
Melody is best if it is sticks in the mind! The professionals think that way at least.
The point here is to make the melody as memorable as possible.
How to do that?
Whenever you write the melody for your song, make short 2 to 4 notes phrases per two bars for example. This gives the listener a little information to remember which easily sticks in his head.
Repetition further strengthens it to stay in the heads of the listeners.
You can use same phrase as the first 2 bars and then repeat it for the next bars and only slightly change the last measure to conclude the melody in 4 or 8 bars in total.
Short phrasing and repetition is what makes the professionals as professionals.
Just do not make it complex to show off your skills, unless its the kind of music or song you are writing.
2. Professional Music has Every Element Complimenting Each Other
This is very much important. After writing the layers of rhythm, harmony, bass and melody you also need to take care of whether everything is working together.
To sound professional, you can refer this too- How to make a catchy chorus in 6 steps.
Many novice producers put everything that they’ve just learned into their music but ultimately they are not able to hear their own music themselves! What they do not realize is music works as a whole.
May be they loved their bassline and perhaps they wrote a killer chord progression. But ultimately both do not work together in the track! What do you do?
Of course you need to adjust one of the two accordingly even if you love both.
Same is with each element. Music is about the whole, like a story and not the individual elements. You need to have only one hero and the supporting characters. Everyone cannot be the hero!
Read – 10 Must Know Music Licenses and Contracts
3. Professional Music has No Abrupt Changes Occurring
Whenever you hear the commercial music, notice that there is no single moment that shakes you and wakes you up like, “Hey, what just happened?”
The professional producers and song writers take utmost care that the changes that occur don’t sound abrupt and out of nowhere to the listeners.
Always have something that signals that the section is about to change in the song. This can be done by a number of things. Drum breaks, reverse cymbals, reverse kicks, reverse reverb or a total silence of a bar or two.
Basically, your listeners should get a signal that something is about to change in the song so they must expect it and know already about the change to happen.
Smoothly transitioning from a section to another is what separates a novice from a professional.
4. Professional Music is Made with Only Necessary Elements
Never ever put anything just for the sake of putting in your music. You only need necessary elements which help in driving the music further.
A typical rock song for example has drums, bass, guitars piano and vocals.
It wont work well if we put twisted synths from dubstep along with these elements (not saying it’s a rule but you get the analogy).
Always have a well thought out plan for your track as an entirety.
And if for any reason, you happen to put some extra elements out of creativity, make that fit well with other elements.
5. Too Much Decoration Results in An Unprofessional Sounding Music
This applies to everything you do. Never overdo anything.
Always stick to the basics or as they say “Stick to the script”. This is an invaluable advice.
Unless you are very sure about what you are doing and why, do not do anything.
Even a song can become a hit if it has may be 2 or 3 elements in total. There are plenty of them.
But an overly decorated music will sound garbage and unprofessional.
So as a beginner or as a not-yet-professional you need to learn it as a mantra!
6. Professional Music Producers Follow Call and Response Technique
This is a building block for every music producer which helps him to make his music to make sense easily. Makes sense?
This technique has existed from the era of Mozart and the likes.
To make your musical sentences structured and to be interpreted easily, this method helps because professional music is always well structured.
If you are making melody for example, make it in two parts.
The first part being the call and the second part, a response.
Take “twinkle twinkle little star” as an example. In the first bar, the melody of the line twinkle twinkle little star is a call and in the second bar, how I wonder what you are is the response to that call.
Makes sense?
For now just forget the words and only focus on the melody, you will understand the point.
If you pay attention to all the popular songs, you will realize every song’s melody has this quality.
You could have even broken the first line itself into call and response. The twinkle twinkle be the call and little stars be the response.
A melody and everything in the song is structured in a block of two parts, even the drums if you listen closely.
Make melodies with this technique and you will always have a structure in your melodies which will make sense to the brain to be easily interpreted, which is what professional music always has.
7. Professional Music Producers Use Tension and Release for Emotions
This refers to the development of the emotional energy in the music.
Creating all the anticipation and the climax in the music comes with this technique.
How huge of an emotion you want to build, is done keeping the tension and release in mind when arranging.
A few techniques to build tension is to use a steady drone or use some tension chords in the sections like the pre chorus or the bridges, may be intros as well.
A steady drone is a long sustained note that creates tension because it wants to resolve somewhere but it doesn’t.
The Hollywood movies swear by it.
Watch any suspense scene, it has a sustained string sound or a rhythmic sequence that keeps playing for ever until the scene is over.
It does not resolve and hence feels incomplete and uneasy to hear hence creating a sense of tension.
You can also use a rising noise sweep or a gradually rising sound effect in the background to reach the climax that is release, which typically is a chorus.
Wherever you want to give the payback or climax to the listener, build tension before that section.
More – Tension
8. Professional Music has Varying Dynamics In The Instruments
Another important technique to make your music sound professional is to make the dynamics of the sounds as real as possible, just like a real instrument will have.
Since in modern music a lesser percentage of real instruments is used.
For example if you are programming a drum pattern, play with the velocity of the drum hits so that it mimics a real player.
A real drummer can’t be perfect as a machine so give the drums a human feel.
Some hits can be strong on the grid, some a little weak and off grid etc.
Similarly every virtual instrument has a velocity control.
You can even automate the volume for instruments like a string.
Making some long sustained notes to slowly rise in volume like a real player does.
Check out a violin performance.
9. Perfect Sound Selection Makes Your Music Sound Professional
The professionals always consciously select sounds. What they focus more upon is the overall vibe of the song or the music.
Hence it doesn’t matter if you like supersaw but since the vibe demands a sine wave synth, you should definitely use one.
Similarly there is a balance to be maintained in the instruments.
I have useful tips about perfect sample selection always, learn it here – How to select drum samples for a track.
If you have a deep subby 808 sound, you should choose a kick that will work with the 808 and give it the space it needs and also enhances the feel of the music.
Tip:
If you have a slow tempo song, a deep kick drum can be a good choice whereas if you have a fast tempo song like dubstep or drum n bass, a punchy kick with less bottom end will fit well.
If you have a mid range lead synth, then for the counter melody, you should choose a synth that is may be in the upper octaves or lower, to the lead.
Avoid sounds that will take the same region.
10. Clearing Samples Make your Music Sound Professional
When you use samples in your music, many times your samples have a different bpm on which they were prepared, so they need to fit within the grid of your new bpm.
To get professional samples – How to make samples sound better – 11 practical tips
Often in this situation, they turn out to be out of sync, hence you need to fix that! Also they may go longer or shorter than the sounds in your current project. Cut the extra tail in any sample.
If its a short sample, time stretch it to fit with other sounds.
Never cut and leave any sample as is. Always perform fades after trimming your samples as it will keep the distracting clicks off of your music and will give it an error free sound quality.
11. Professional Music is Made with Perfect Vocal and Instrument Recordings
Aspiring music producers should never ignore the importance of recording phase.
Always use a professional dedicated microphone for recording vocals and instruments.
If you can not afford costly mics better record in a recording studio.
Also learn more about getting professional vocals – How To EQ Vocals Correctly In 11 Easy Steps – With Pictures
If you just record perfectly the results will surprise you!
If you record at home, treat you recording room perfectly. Use high quality sound absorbents to deaden the reflection.
Arrange so that the room is noise proof.
After doing all of this, what you do with the recordings will further decide the quality of your music.
This is what the next step is about.
Well, even if there is a mistake, the professionals also know how to rectify or mask it, hence you should too!
12. Clearing The Vocal Samples Results in A Professional Song
When you record vocals, chances are that some annoying breaths and mouth sounds get recorded as well like the lip smacking or the pops etc.
The pops are the plosives, meaning it is when you pronounce words which start with P, B, T, and D.
These sounds blow a large amount of air on the mic at a single point of time which sounds like an explosion in the final recording.
A Pop Filter solves this problem very efficiently.
The lip smacking sounds are best cleared manually and will result in a very improved recording at the end of the day.
Also you can use Izotope Rx8 Mouth De-Click or the ERA Mouth De clicker for it.
13. Good Mixing and Mastering Results in A Professional Music Track
Now as you have arrived till here, you need to make everything fit well and perfect with each other. A good volume level for every instrument can make or break the record.
Now, you may also want to know – Is mastering necessary?
At this stage you need to mix them perfectly. Use effects like reverb and delay where needed in only enough quantity and not much.
Using compression for thin sounds will make them more thick and prominent.
Compression is used for shaping the dynamics of a sound hence learning it will get you ahead of the curve.
For making space for instruments to fit together use EQ.
It may happen that you overdo it hence moderation is the key. Just know that typically, shelf and bell EQs are better in moderation.
If that does not work, may be you should change the sound. Extreme manipulation is only good to bring out some frequencies that you feel are nice to have if you boost or to not have if you are cutting.
Compression is the most important tool to learn – Mixing with compression – In 13 Steps
A decent pair of monitors in an acoustically treated room and/or studio headphones are must for getting the mix perfect. Also for mixing you can use Izotope Neutron. It is an AI powered auto mixing plugin.
You select the important elements of your track and the plugin creates a mix for you as a starting point or you can even finalize it!
After mixing the song well, leave a -6db headroom for mastering. In mastering stage, make enhancements like stereo widening, overall compression to glue the whole song.
A mastering engineer doing this is preferred because a song needs fresh ears to judge it objectively and make corrections and enhancements.
Remember to keep a professional reference track similar to yours, to copy its tone. With every adjustment you make, A-B it to compare with the reference song. Try to get as close to it as possible.
If you can afford, use Izotope’s Ozone Mastering Suite because it can record the reference track’s tonality to be applied to your song.
14. Less is More When Making The Music Sound Professional
With all the above steps done, there’s one thing to realize which is, whatever you do, do in moderation. When you do too much, it reduces clarity and focus. It sounds unconfident.
The professional tracks sound full because, the professional producers put everything with a well thought out plan in mind. They do not overdo anything.
The more experienced you become, the lesser complicated your stuff gets.
Lets look at a few more important questions that bothers aspiring producers..
Why My Music Doesn’t Sound Professional
This could have a number of reasons some of which could be…
- You don’t know music theory well.
- You may be good at composing but bad at production or vice versa.
- Your recordings are not done professionally or they are not processed professionally. May be your mics or recording area lack treatment.
- You don’t know mixing or mastering or both.
- Your mix does not translates well.
- You picked a wrong genre.
- You have less experience than those who inspire you so you are expecting too much at this stage. You should learn the art in depth.
- You ignore to hone the required techniques and you are in a hurry to just “get there”.
Read – How to record vocals on phone professionally.
How Do I Make My Music Sound Full
Well to make your music sound full you can take these steps:
- Visualize your music and have an end goal in mind first.
- For depth you need to think in terms of width and the whole frequency spectrum – low to high.
- Consider layering your instruments for thickness.
- Use reverbs to make instruments big and give them more space.
- Use saturation to fatten up the sounds.
- Compression is the key for the sounds to give them enough attack and and also enough body. Use analog compressor like VCA for a fat sound.
- Considering the fullness, the low end has so much importance and for that purpose, boosting it just enough with an EQ will help.
- Mixing with compression, EQ and saturation will make the track more full.
- Leave headroom of minimum-6db in your mixed track for enhancements during mastering.
- Now finally, master your track with further enhancements like, compression, EQ, stereo width and saturation and limiter. Remember that typically, analog gears are used for achieving fat and full sound.
- You can use two limiters instead of one so that the first one tames some spikes in the track and the second one does the overall limiting.
Can I Master My Own Track
Well, of course you can master your music but you need to be expert in it and you should be having the equipment needed for the purpose, if your goal is to make commercial tracks.
However, for getting a good mastering result at home, the most important stage is mixing.
If you can achieve a good balance of all the instruments and also could polish them, your master will just do fine.
You will only need to do a bit of enhancement and get it louder (not the loudest) .
While production itself can be a challenge for any beginner, mastering needs a totally different skillset.
The main goal of mastering is to balance the overall tone of the music and at the same time make it translate well on various playback systems and make it competitive.
For this you very much need what is called a reference track which is a professionally produced commercial track that you hear on radios.
You need to compare your track to the reference track and try to achieve the tone of it in your track, as much as possible (well, 100% to be honest).
During this process keep A-Bing both tracks to compare their sounds.
You can even use an advance plugin like Izotope Ozone Mastering Suite for automatic mastering.
Check this out if you haven’t– Apache Essentials Drum Sample Pack
Conclusion
The overall goal of making the music or song professional is not that hard to achieve if you give enough efforts to it.
You need to follow professionals wherever you can.
Follow there tips and learn from them. And don’t forget, they were also beginners in the past!
Make more music, make more mistakes and learn from them.
That’s how your experience will increase.